
NSX Application Platform Part 1: Environment Overview
Lab Architecture, Resources, and Software
This will be a four part blog series detailing the deployment of NSX Application Platform (NAPP), with vSphere for Tanzu, NSX-T, and NSX Advanced Load Balancer (Avi). The series begins with an overview of the environment, which hopefully makes the subsequent articles easier to digest.
I have recently put together a video that provides clear guidance on deploying NAPP, it can be seen here.

NSX Application Platform (NAPP) // NSX Advanced Load Balancer (NSX ALB)
Understand NSX Application Platform (NAPP) architecture and how to deploy it using NSX Advanced Load...
Lab Topology
This section will focus on the general architecture of my lab environment. I have provided an illustration below that highlights the key components that will be referred to or utilized in some way during this series.
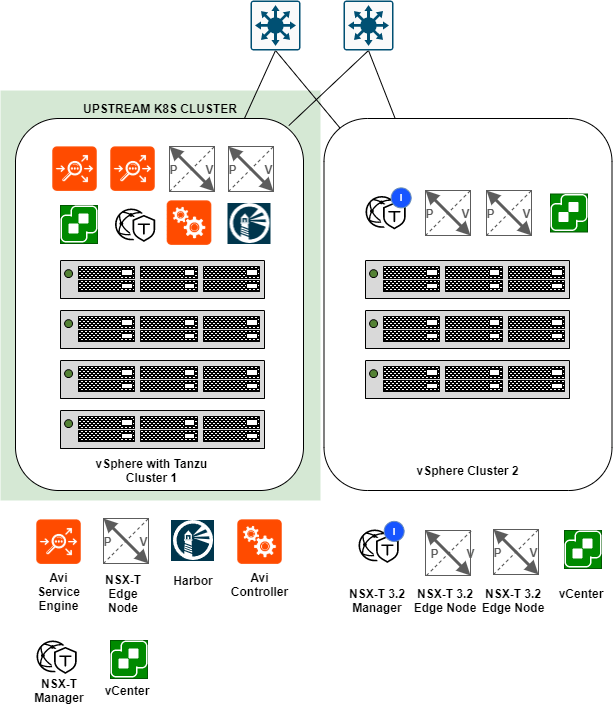
vSphere Cluster 1
This cluster acts as my upstream Kubernetes cluster for vSphere Cluster 2. The pods that are deployed as part of the NAPP deployment will be running on the worker nodes in vSphere Cluster 1.
The software that is deployed to this cluster consists of:
- NSX-T 3.1.3
- NSX Advanced Loadbalancer (Avi) 21.1.1
- Harbor 2.4.1-c4b06d79
- vSphere with Tanzu
- vSAN
- vCenter 7.0 Update 2d
- vSphere (ESXi) 7.0 Update 2c
vSphere Cluster 2
A greenfield cluster running only NSX-T 3.2. The following is a list of the software versions running on this cluster.
- NSX-T 3.2
- vCenter 7.0 Update 3a
- vSphere (ESXi) 7.0 Update 2a
- vSAN
Logical Networking
The supervisor clusters, guest clusters, and the VIPs will all be provisioned on NSX-T Overlay segments. When deploying workload management in vSphere there are two options for networking:
- NSX-T
- vCenter Server Network
In this series, I actually deploy workload management using vCenter networks. However, the networks selected are overlay networks, created in NSX-T and presented to vCenter. I have chosen this path as I did not want to use native NSX-T load balancing.
Selecting vCenter networking allowed me to utilize NSX Advanced Loadbalancer (Avi) for load balancing. This process will be covered in more detail in part 3 of this blog series.
The diagram below is a logical representation of the networks being used in this series.
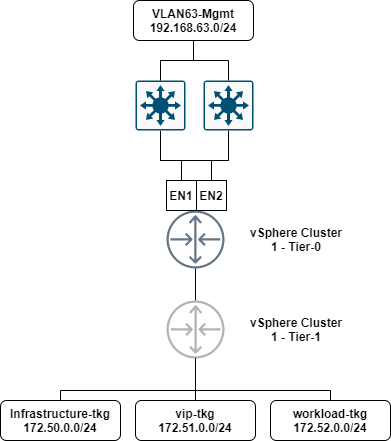
The segments shown in this diagram are the main networks that will be used in this series. A quick breakdown of each segment is as follows:
- VLAN63-Mgmt: Each appliance that requires a management interface will be configured with an IP address from this range. Appliances such as; NSX-T Manager, NSX-T Edges, NSX Advanced Load Balancer (Avi) Controller, Harbor, etc. This is a standard VLAN trunked to each host.
- Infrastructure-tkg (Overlay segment): The Tanzu Supervisor Control Plane virtual appliances will each have an interface configured in this range.
- vip-tkg(Overlay segment): VIPs created in NSX Advanced Load Balancer (Avi) for the supervisor and guest clusters, as well as ingress or service IP’s will be configured in this range.
- workload-tkg(Overlay segment): Tanzu workload nodes will be configured in this range.
NSX Application Platform Architecture Overview
The NSX Application Platform hosts key security features such as; NSX Intelligence, Network Detection and Response, Malware Prevention, and Metrics.
NSX Application Platform’s architecture is structured around a micro-service design, as part of its deployment it creates and configures several namespaces and pods for services such as cert-manager, project contour, envoy, etc. These namespaces and pods will be covered in more detail in part 4 of this series.
There are several options to deploy NAPP, however, in this series I use vSphere Cluster 1 which has Tanzu (workload management) enabled, to provide a platform for NAPP’s microservices to be deployed to.
Configuring the Platform
Throughout this series I will be referring to and displaying commands run on a jumpbox, this will act as a central point for all my management, binary uploading, and configuration activities.
If you wish to deploy your own, my jumpbox has the below configuration.
Jumpbox Hardware
- 2 vCPU’s
- 8GB RAM
- Two Hard Disks – OS (80GB) / Data (200GB)
- Single NIC on VLAN63-Mgmt (192.168.63.202)
Jumpbox Software
- Ubuntu 20.04.3
- containerd.io / docker-ce / docker-compose – install instructions can be found here
- Helm – install instructions can be found here
- kubectl / kubectl-vsphere plugin / Tanzu CLI – install instructions can be found here
- NSX Application Platform Binaries extracted to the data drive, binaries can be found here
Note: I attempted to create a Windows jumpbox first, however, it was simpler to use Ubuntu. The major reason for this was, the NSX Application Platform binaries has various images within it, some of them have a colon (“:”) in the file name. Windows doesn’t support this character in the file name, therefore, when extracting the binaries, it replaces the colon with an underscore. When you attempt to upload the images to the Harbor registry using the script, the process fails as it is looking for the original file name with the colon.
Next Steps
NSX Application Platform Part 2: Harbor Image Registry
The next article in this series will provide a step by step walkthrough on how I deployed Harbor in my environment.
NSX Application Platform Part 3: NSX-T, NSX-ALB, and Tanzu
This article focusses heavily networking and Tanzu. It will show how I configured NSX-T, NSX-ALB, and Tanzu.
NSX Application Platform Part 4: Deploying the Application Platform
The final part of the series demonstrates the deployment process for NSX Application Platform and its security features (NSX Intelligence, Network Detection and Response, and Malware Prevention.
Shank,
Thank you for this series of blog posts. I have a few questions for you:
1) I’m looking at building out a similar lab environment. Can you elaborate on the RAM, vCPU, Disk resources that you’ve provisioned for each of the ESXi hosts in your vSphere with Tanzu Cluster #1? FYI, I’m assuming you’ve built this nested.
2) Is there a technical reason why you built out two completely separate environments (1 for each vSphere cluster) rather than just have two vSphere clusters that are controlled/managed by a single vCenter Server and NSX-T Manager?
3) To expand on question #2, I’m guessing it’s to ensure that the K8s cluster is completely separate from Cluster #2, but wonder if there wouldn’t be efficiencies in terms of N/S traffic by having the K8s cluster components on it’s own Tier-1 gateways, sharing the Tier-0. Any concerns/comments about combining them?
Thank you for the post, and I look forward to your response.
Luis
Hi Luis,
1) Hardware details for my entire lab can be found here https://www.lab2prod.com.au/the-lab, noting, I do not run nested in my lab.
2) A couple of reasons, I wanted them completely separate, with a clear demarcation, as I provide lab access to others. Also, as it is a VCF domain, I did not want to skew from the VCF bom which would cause upgrade issues down the track. I also wanted to have the secondary cluster run NSX-T 3.2 with NAPP as a test environment, as to not impact what I already have running and has been stable.
3) Do you mean having NAPP / 3.2 / k8s running on a single cluster and segregating it all via T1s? If so, there should be no problem in doing this, when deploying Tanzu with the NSX-T option it will create its own T1, otherwise you will have to do this manually if you folllow the logical networking configuration I have demonstrated in this series (vSphere / NSX-T segments / avi). The Tier-0 gateway is shared using the NSX-T option.
Apologies if I have missed the mark for #3, feel free to respond and I can clarify if required!
Hope this helps 🙂
Hi Shank,
Does the above work with NSX 4 ?
Hi,
Sure does!
Some slight changes in v4, between the blog series and the YouTube video linked at the start, you will have everything you need. 🙂
Thanks a million !
Hi Shank,
does the same apply on ESXi8?
Thank you for the posts
Joseph
Hi Joseph,
It should indeed, keep in mind there are tested versions compatible with NAPP (that’s not to say it won’t work on versions outside of this) https://docs.vmware.com/en/VMware-NSX-T-Data-Center/3.2/nsx-application-platform/GUID-D54C1B87-8EF3-45B3-AB27-EFE90A154DD3.html.
Just from a supported standpoint, these are what were tested.
My pleasure 🙂
Regards
Shank