
Multisite Deployment of NSX-T Data Center Part 2| LAB2PROD
NSX-T Active-Active Multisite in a Single Region and Failover to a Secondary Region Part 2
This article will focus on the configuration, demonstration and testing of NSX-T Active-Active Multisite and what was discussed in part 1 for NSX-T Active-Active Multisite with a secondary availability zone which can be seen here; Part 1.
This article will not cover the base installation and configuration of NSX-T, the ToR’s or the Core, it will focus on configuring and testing NSX-T Multisite as was discussed in part 1.
NSX-T Multisite Active-Active T0 Uplink Configuration
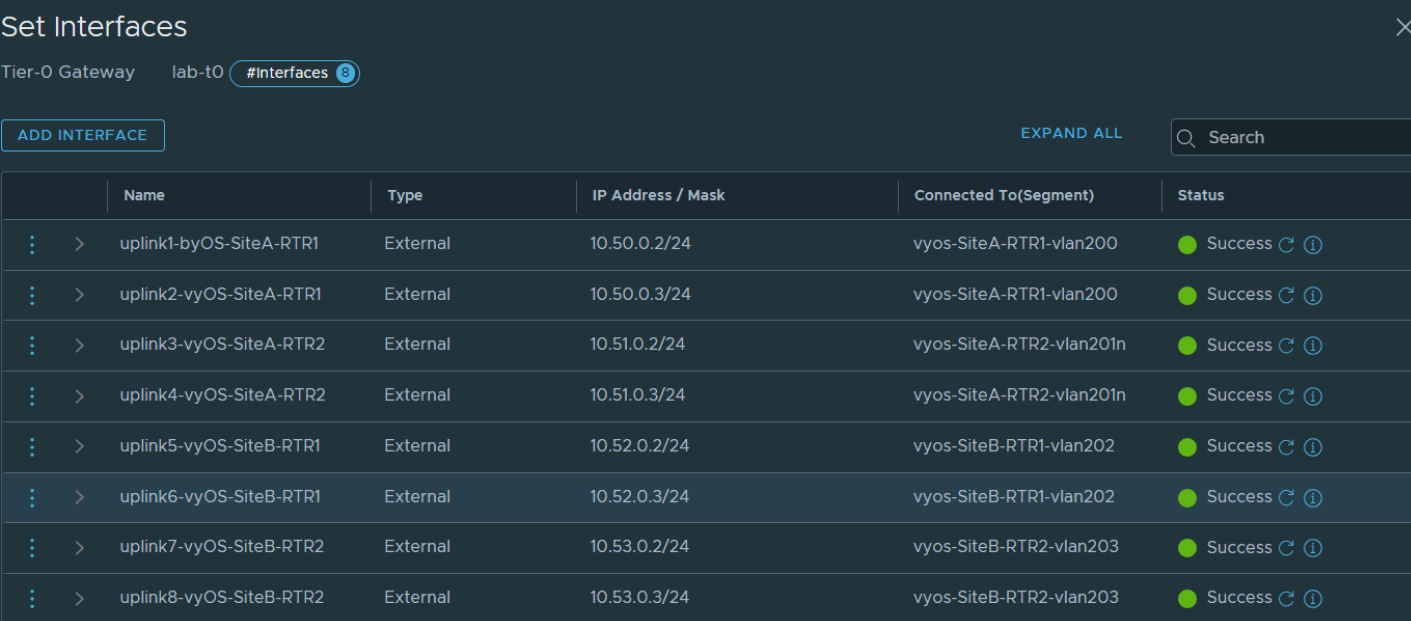
In order to satisfy the the multisite requirements that were discussed in part 1 of this 2 part post, we have to configure more additional T0 uplinks. In the below screen shot you can see 8 uplinks. Each of these interfaces represent a connection to upstream BGP peer. To satisfy the failover requirement each peering is established, that way if Site A fails, the workload sitting behind the T0 and T1 gateways have an active route out via Site B’s ToR’s.
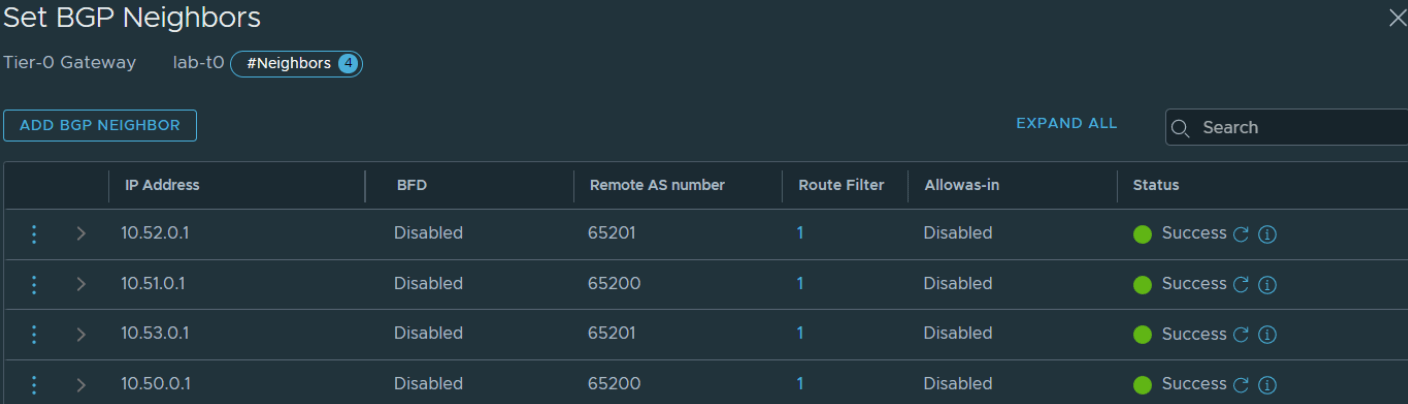
The current subnets being propagated from NSX-T can be seen below.

Routes Learnt on the Core Switch in this Multisite Deployment
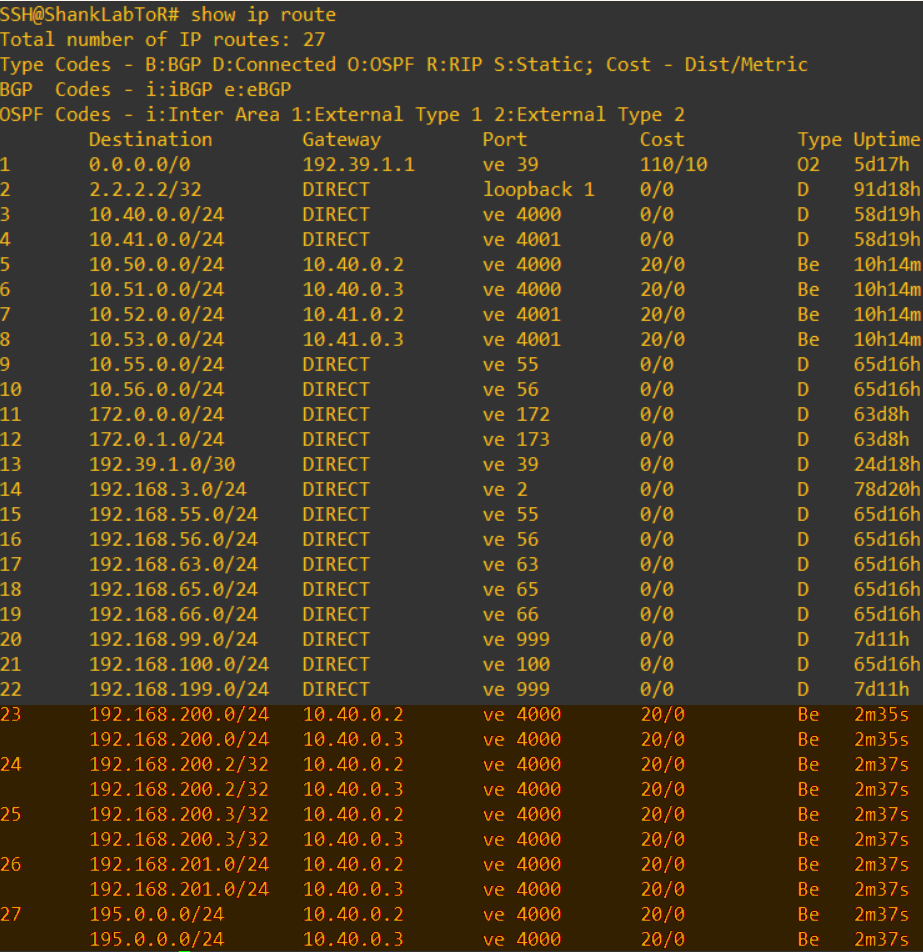
The image below shows all the routes the core switch has learnt.
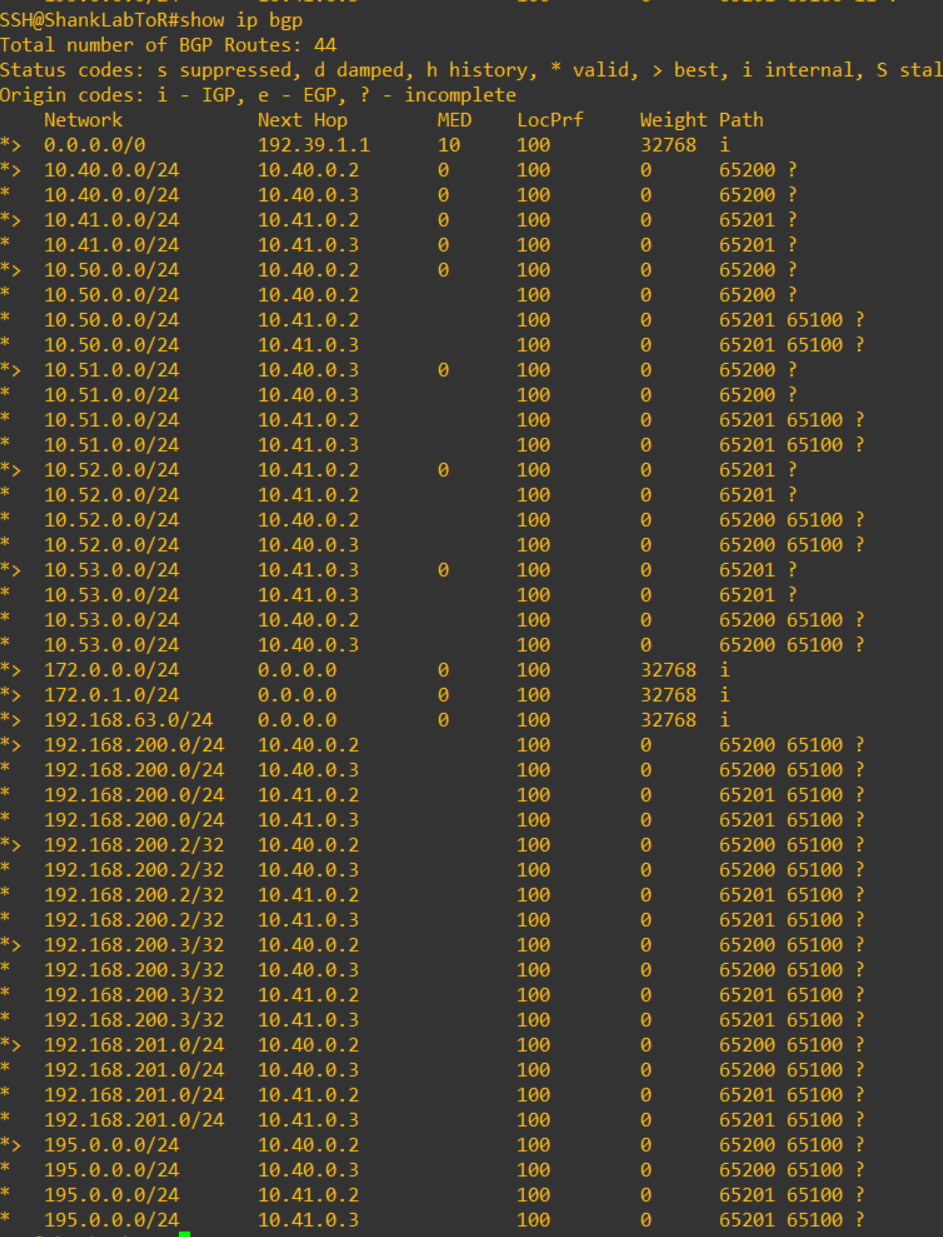 Notice how the routes are learned from 4 different peers, this is reflective of the 4 ToRs that are peering with the NSX-T T0 and the core switch. Performing trace routes into the environment now will be balanced across all peers. Keep in mind that I have configured maximum-paths and multipath-relax on the core switch.
Without these two commands, the path that the core deemed best was injected into the routing table and the same subnet would not presented from two different ASN’s, ie 195.0.0.254/32 was only presented from 65200.
Now that we have routes appearing and all peering working as expected, it is time to configure BGP for Site-A to be preferred.
Traffic Steering for the Preferred Site in an Active-Active Multisite deployment
In this section we will create the prefix lists and route maps that will prepend the AS PATH and modify the local preference to appropriately steer the traffic as we need.
Creating IP Prefix Lists for Route Maps in NSX-T
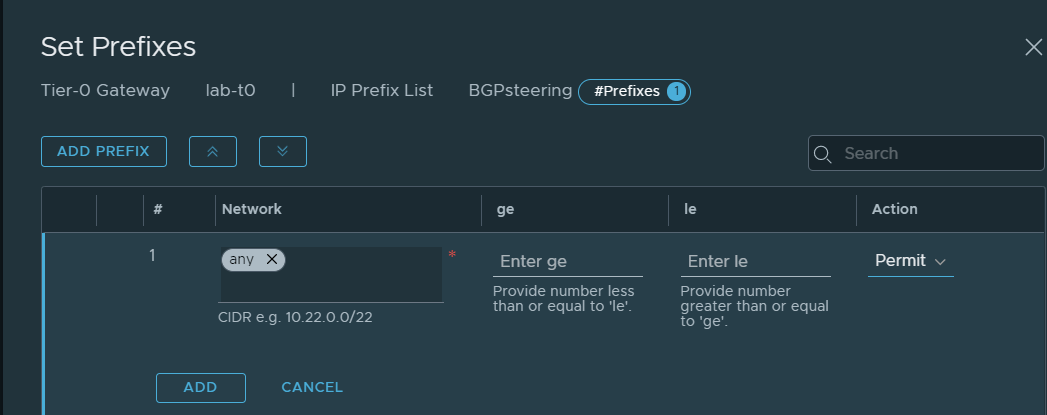
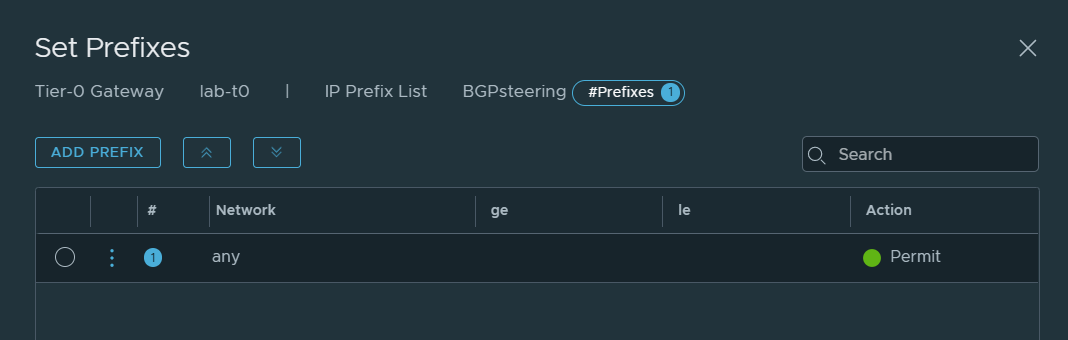
Navigate to Networking, Tier-0 Gateways, Edit the T0 and expand Routing, and click on the link in IP Prefix Lists. Click on Add IP Prefix List, give it a name and click on set. In the screen you are presented with next, click on Add Prefix and enter the details that can be seen in the below image. After you are done, click add and then save on the next screen. The following images in this section highlight the same process.

Creating Route Maps for determinstic data flow in NSX-T
In this section we will create two route maps using the above prefix list, one will be to prepend the AS PATH to the upstream and the second is to configure local preference for local egress, they will be named SiteB-in and SiteB-out.
Configuring a Route map for AS PATH Prepending
To configure route maps while in edit mode of the Tier-0 gateway, click on Route Maps in the Routing section. Click on Add Route Map, name it SiteB-out and click on set. Click on add match criteria, ensure IP Prefix is selected, click on the members link and select the IP Prefix list we created earlier, clicking save. In the first set column you have the As Path Prepend option, here add in what you would like to prepend the path with, here we have used the number 11. Leave local preference at its default of 100 and ensure the action is set to permit, clicking add, then apply and saving the route map. Refer to the image below.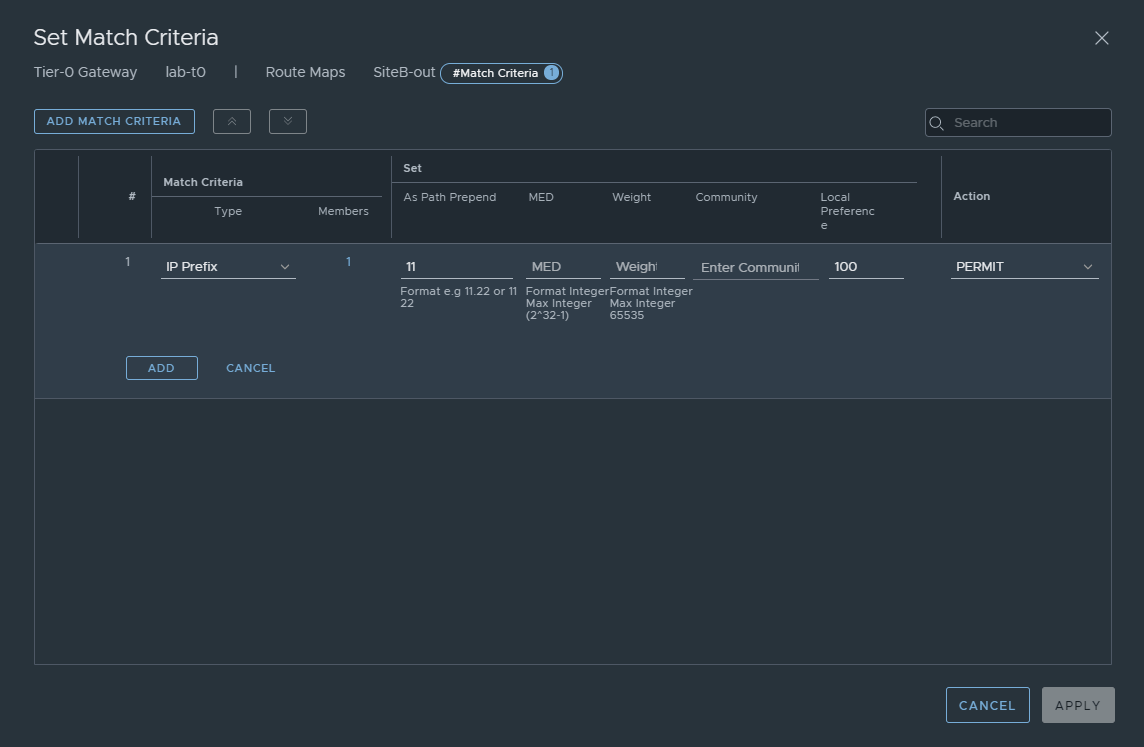
Configuring a Route map to set Local Preference
In the previous section we covered creating a route map to prepend the AS Path, here we will repeat most of the same process, instead of the previous settings add the settings in the below image to set local preference. Doing so tells NSX-T which paths to prefer when there are multiple paths in this active-active deployment. 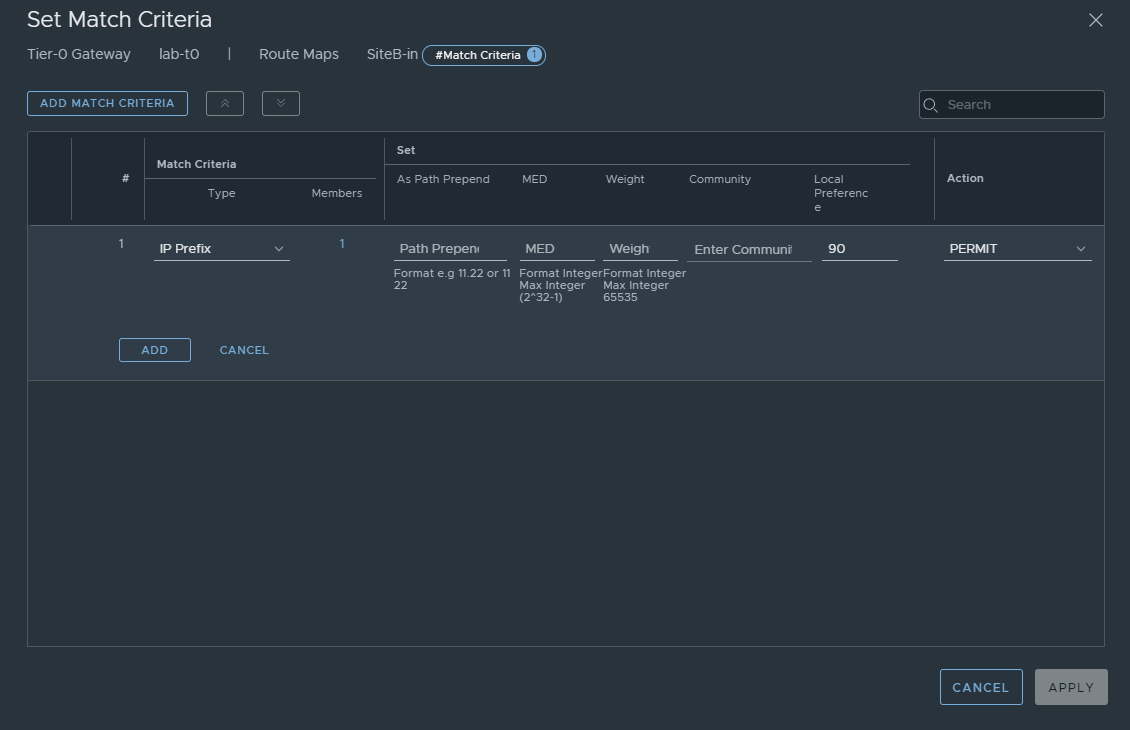
You should now have two route maps created and see something similar to the below image.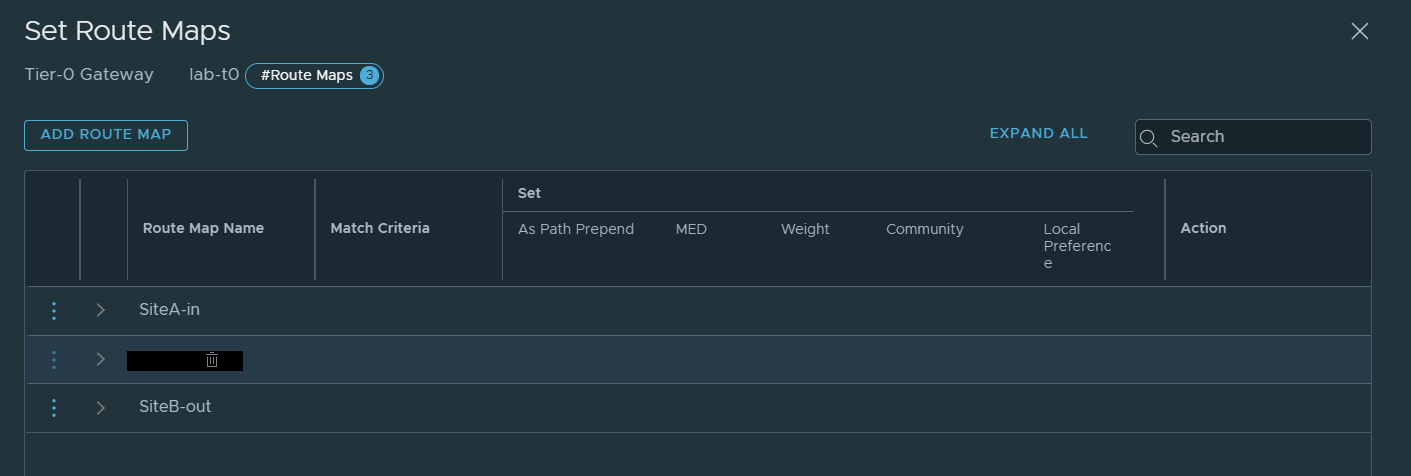
Applying Route Maps in NSX-T
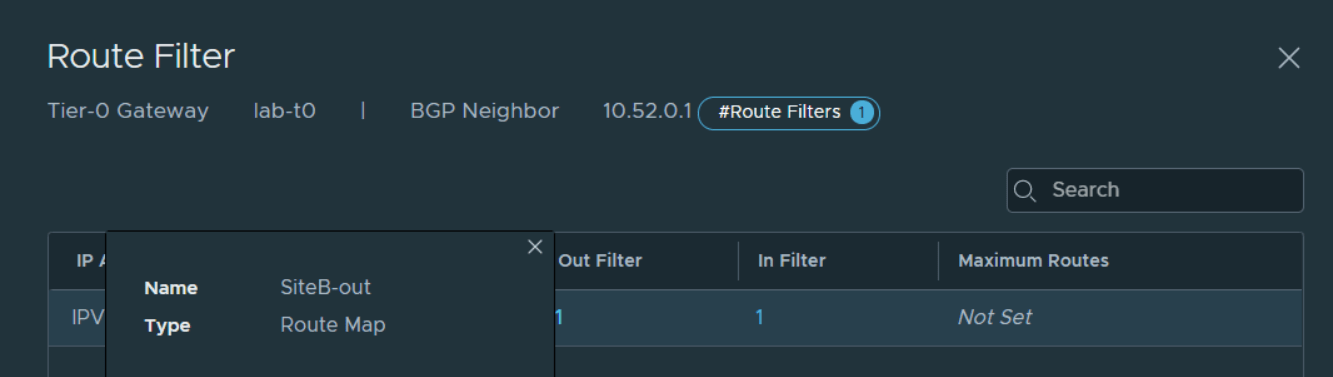
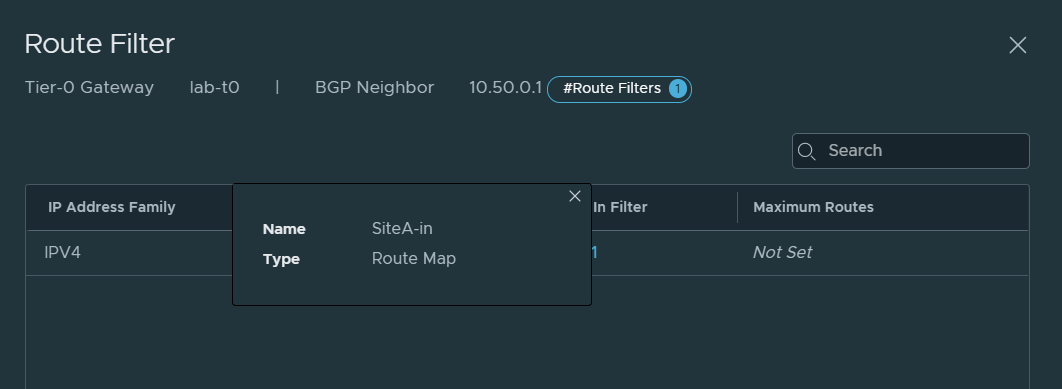
Now we must apply the Route Maps to the Site B peers, this can be done by going into the BGP neighbours, editing one of the peers, clicking on the link in the Route Filter column and then Out Filter. Apply the route map that was just created to prepend the AS Path, and then completing the same for the in filter, ensuring you use the filter called SiteB-in. Repeat this step for all peers that need to be prepended. In this case it was all Site B peers.
Routing Table Verification
Now that is all done, let’s have a look at the routing table on the core again.
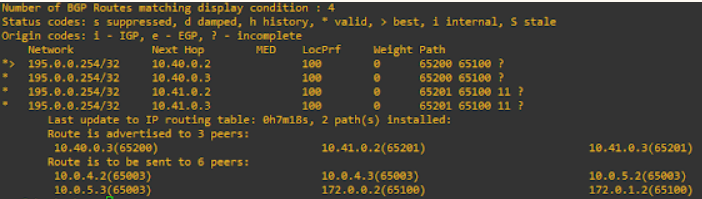
Here we can see that the routes being injected into the routing table are from the AS in Site A, as I prepended Site B’s path to make it seem longer to the core. The below image shows the routes still being advertised from the ToR’s in Site B, however pay close attention to the path.
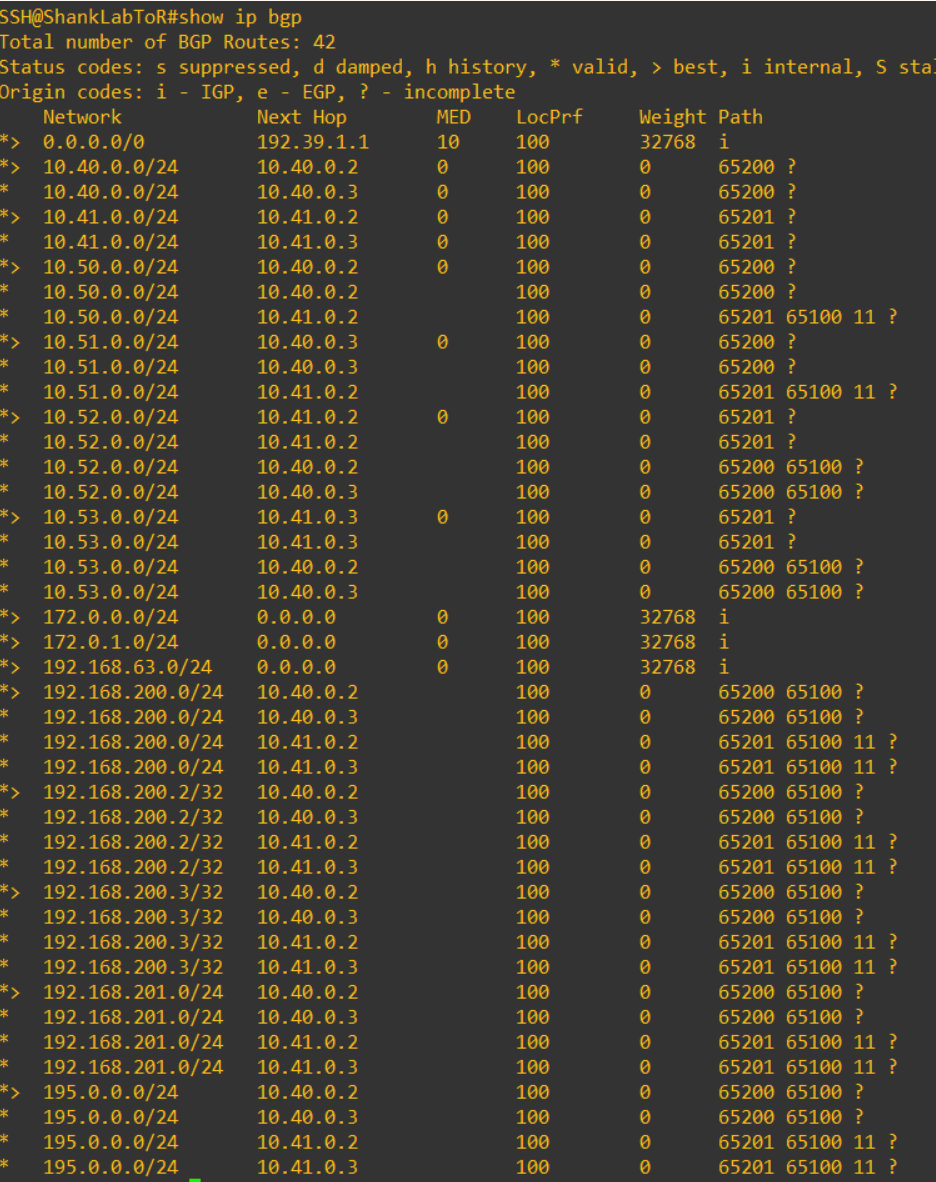
The image below is the routes BGP has learned, notice here you see the prefixes listed multiple times learned from each peer.
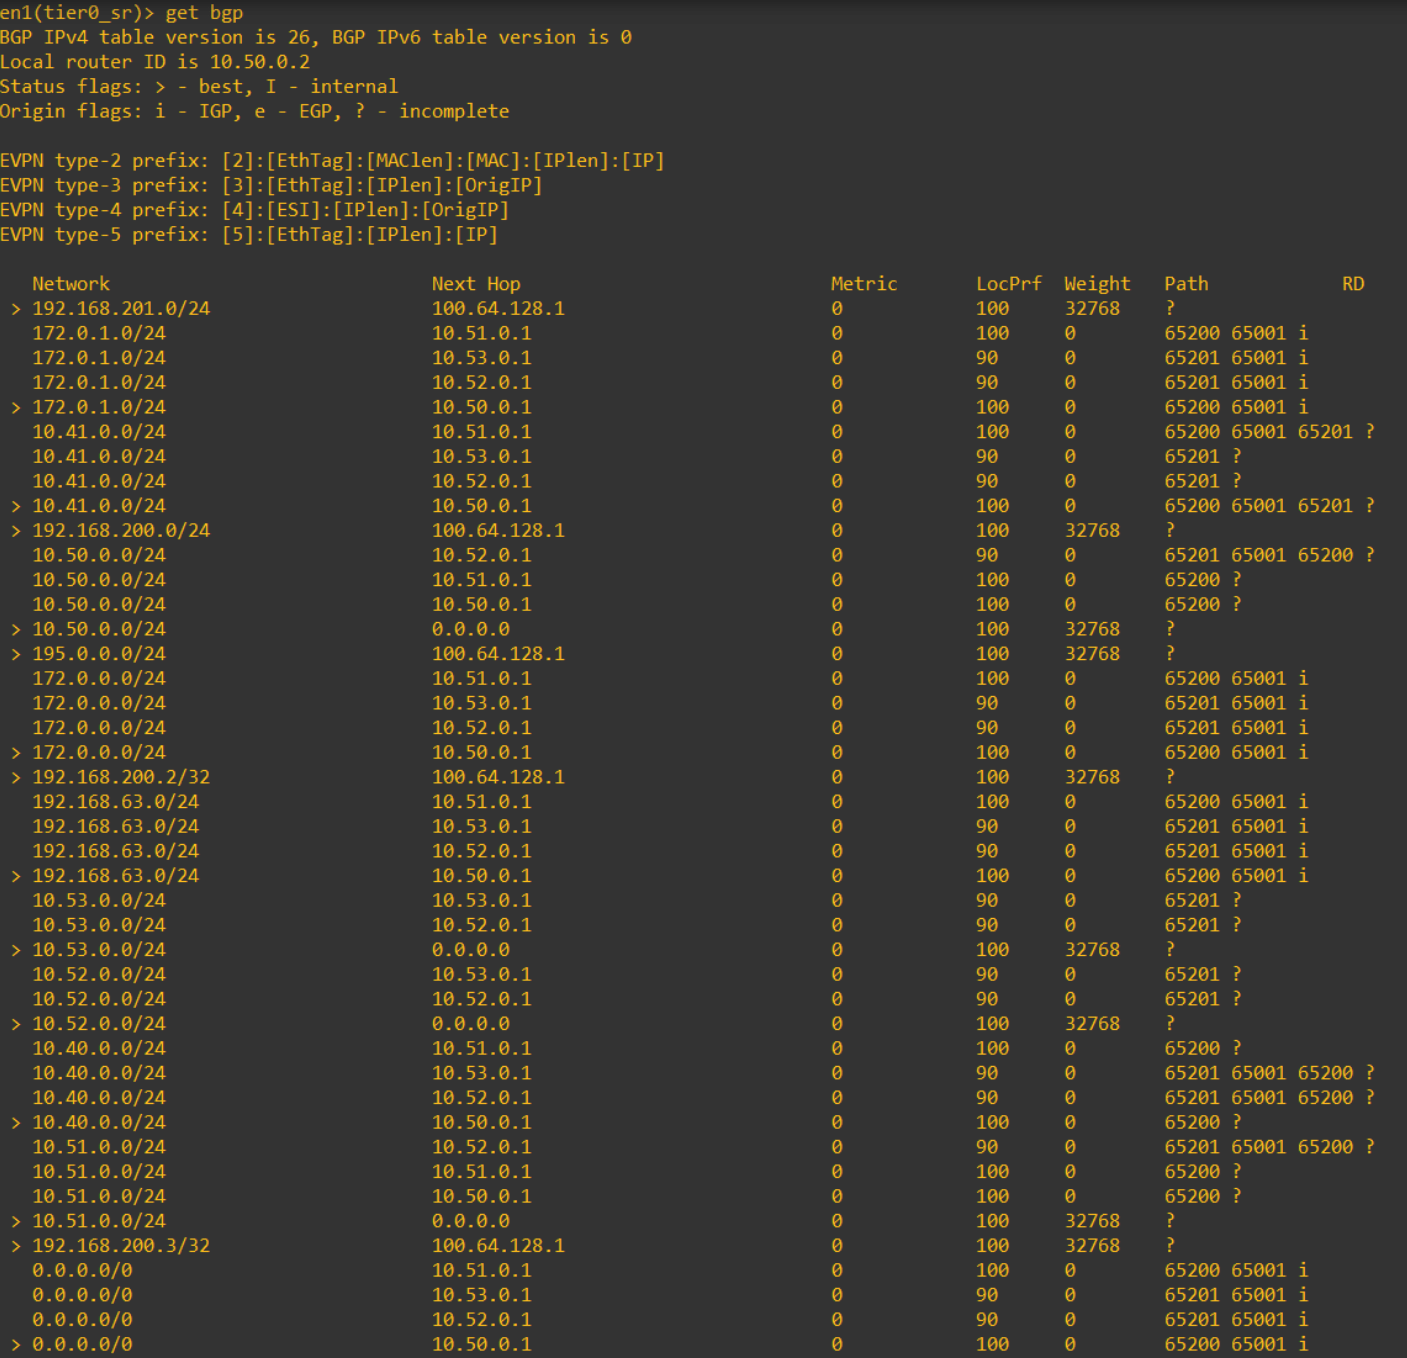
This is an image of the routes on one of the edge nodes.
NSX-T Active-Active Multisite Failure Testing
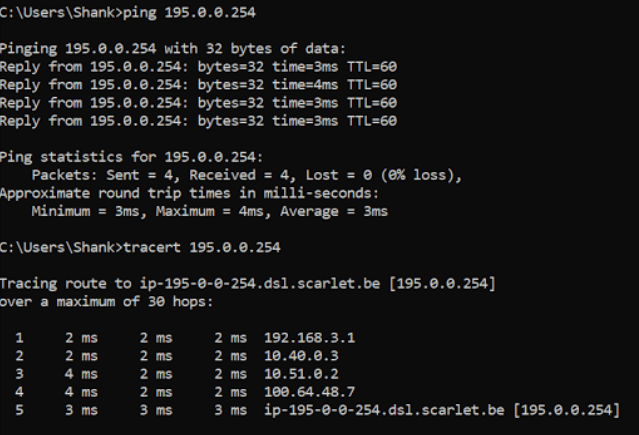
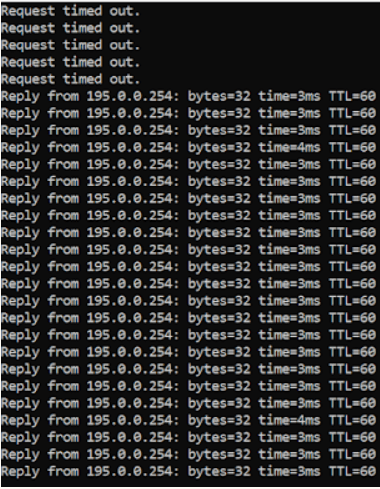
Next we will perform a quick failover test to show this working. I begin by pinging 195.0.0.254 from my desktop. This will now route through the Edge’s uplink interfaces in Site A.
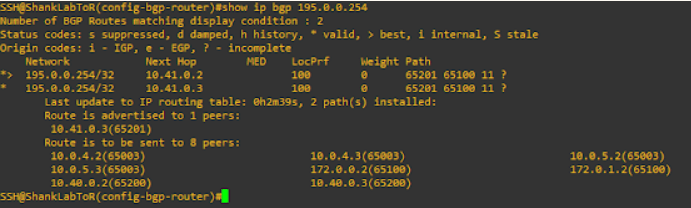
Shutdown the ToR’s in Site A and below is the route table in the core after doing so.
Below is the ping output, I dropped more packets than I should have as I hadn’t configured BFD between the peers (you really should do this for faster failover).
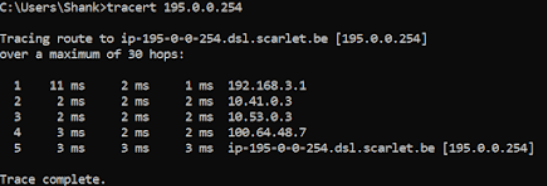
Finally, below is the trace route from the same desktop.
A couple of other things you will need to look at are:
- Using community lists to avoid re-advertising routes learned from the physical network
- uRPF so that ECMP can work properly.
Links to configuring these two features can be found at the bottom of this article.
This concludes the second part of this article and hopefully has shed some light on how this all works. If you would like some questions answered or need anything clarified, leave a comment!
Hey,
how you did you implement the local egress from site A. AS-Path-Prepend from ToRs down to T0? With the configuration provided here, T0 would send traffic via all ToRs egress.
Cheers
Excellent catch my friend! I completely missed adding a step into this.
But to answer your question, route-maps are your friend!
We have to create 2 route-maps.
– One route-map for traffic egressing through the Site B peers, this route map prepends the path. Doing so makes these peers / paths less desirable to the rest of the network.
– The second route map is for the in-filter on the peers pointing to site b, and we set the local preference to 90. 100 is the default and the path with the high preference will win.
– The prefix list used for both of these route-maps is any / permit.
I will update the post shortly to show what I missed out on and the route table on the edges to show the preference setting in effect.
Again, awesome catch and glad you are reading!