Replace a Failed vSAN Diskgroup on a VCF Managed Node
VCF Upgrade Workflow Description – Upgrade – ESX_HOST
The Issue? SDDC Manager Upgrade Workflow Fails During the Host Upgrade Task If There Is a Failed vSAN Disk Group
It is sometimes hard to keep track of all nodes, disks and disk groups in an environment. The fact of the matter is.. drives fail. If this occurs on one of your nodes and you haven’t realised, depending on your vSAN storage policy, you could be in trouble very soon! This article shows you how to replace a failed vSAN diskgroup on a VCF managed node.
The other issue arises when attempting to update a VCF environment that has a non-healthy vSAN cluster. You will likely encounter a similar situation to what is detailed below.
The VCF upgrade workflow made it all the way to upgrading the hosts and failed. The error “null Manual intervention needed as upgrade failed during install stage. Check for errors in the lcm log files located on SDDC Manager under /var/log/vmware/vcf/lcm. Check for VSAN Health warnings/errors in the vSphere Client. Resolve the issues and make sure that VSAN health is green in vSphere Client.
Reference Token: DMP3M3
Cause:”

Troubleshooting the Issue
Sometimes the error messages you get in SDDC Manager are a red herring, and you simply retry the task and it passes. However, no amount of retrying the workflow resolved this one!
The error message is pretty clear, this is a vSAN related issue. Now you will need to identify which host has the issue, and what the issue is.
- Log into vCenter and navigate to the cluster to identify any potential issues. The image below shows the cluster health and we are immediately prompted with a vSAN physical disk alert.

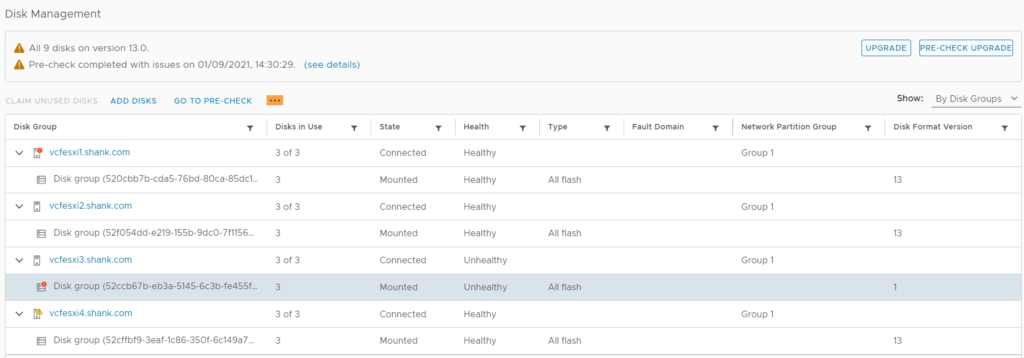
2. Click on configure, then navigate to vSAN, Disk Management. From this image you can see vcfesxi3 is in an unhealthy state.

3. Click on the host that is marked as unhealthy, in the bottom pane, each disk and their state should now be shown. Notice the cache disk state is Dead or Error. As the disk has most likely failed, the disk group on this host will not be used and this host will not be used as a storage node. However, VMs will continue to run and read data from the other nodes. vSAN Failure Scenarios can be viewed here.

Resolving The Issue
The previous section identified the fault, which is a failed cache drive on vcfesxi3.shank.com. The next step is to remediate the disk failure. To do this, the disk group must be removed from the host, you cannot replace just the cache disk. The process to achieve this can be found here. However, as the disk group has already failed, you will need to select no data migration.
- Click on the disk group under the host with the failed disk in the previous image, then select the three dots (highlighted in the image).

2. Select remove from the drop down.

3. Select the type of data migration suitable for your environment, in this case, no data migration has been selected. The option to remove the disk group is greyed out. If you are in the same situation, continue to step 4.

4. The next step is to try via command line. First ensure the host is in maintenance mode, then SSH onto the host.

5. Identify the vSAN disks and disk groups using the command esxcli vsan storage list
[root@vcfesxi3:~] esxcli vsan storage list
naa.5002538e9016f285
   Device: naa.5002538e9016f285
   Display Name: naa.5002538e9016f285
   Is SSD: true
   VSAN UUID: 52514556-3f7b-6455-e924-d7b188d8c475
   VSAN Disk Group UUID: 52ccb67b-eb3a-5145-6c3b-fe455f7091f9
   VSAN Disk Group Name:
   Used by this host: true
   In CMMDS: false
   On-disk format version: 13
   Deduplication: false
   Compression: false
   Checksum: 1956740779600151227
   Checksum OK: true
   Is Capacity Tier: true
   Encryption Metadata Checksum OK: true
   Encryption: false
   DiskKeyLoaded: false
   Is Mounted: true
   Creation Time: Tue Jun 15 05:31:26 2021

t10.NVMe____CT1000P1SSD8____________________________5404782B0175A000
   Device: t10.NVMe____CT1000P1SSD8____________________________5404782B0175A000
   Display Name: t10.NVMe____CT1000P1SSD8____________________________5404782B0175A000
   Is SSD: true
   VSAN UUID: 52de1788-674a-277b-b464-737e3073d858
   VSAN Disk Group UUID: 52ccb67b-eb3a-5145-6c3b-fe455f7091f9
   VSAN Disk Group Name:
   Used by this host: true
   In CMMDS: false
   On-disk format version: 13
   Deduplication: false
   Compression: false
   Checksum: 3433439902698835217
   Checksum OK: true
   Is Capacity Tier: true
   Encryption Metadata Checksum OK: true
   Encryption: false
   DiskKeyLoaded: false
   Is Mounted: true
   Creation Time: Tue Jun 15 05:31:26 2021
6. From the output above, identify the vSAN disk group UUID, in this case it is 52ccb67b-eb3a-5145-6c3b-fe455f7091f9. In my case, all drives belong to the same disk group. This may be different in your environment, so pay close attention to the UUID. The disk group now needs to be removed.
7. Issue the command esxcli vsan storage remove -u 52ccb67b-eb3a-5145-6c3b-fe455f7091f9, there should be no output from this command.
[root@vcfesxi3:~] esxcli vsan storage remove -u 52ccb67b-eb3a-5145-6c3b-fe455f7091f9
[root@vcfesxi3:~]
9. Verify the disk group was removed using the command from step 5, esxcli vsan storage list, this time there should be no output. You can also check disk management in vCenter.

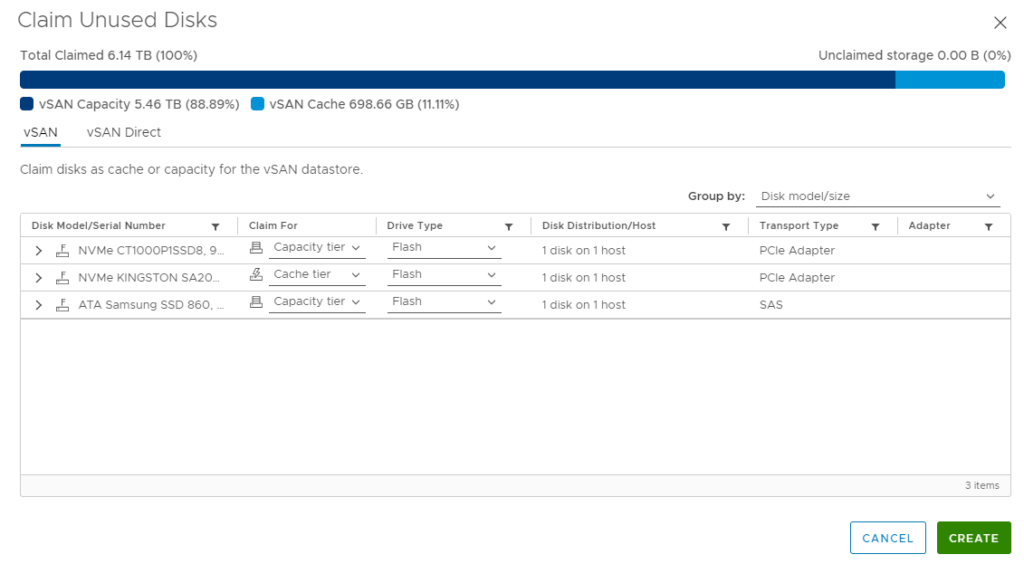
10. The drive must now be replaced in the host, and the disk group must be recreated. First claim the unused disks on the host by selecting the host in Disk Management, and selecting claim unused disks. Ensure the drives are marked correctly (cache or capacity). Select create when done.

11. In this case, once the disks were claimed and the host was brought out of maintenance mode, the disk group was recreated on the host. If this does not occur for you, you may have to manually create the disk group, by selecting create disk group.
12. Once the cluster is healthy again, you should be able to re-run the upgrade workflow and it should now be successful.

Conclusion
The error “null Manual intervention needed as upgrade failed during install stage. Check for errors in the lcm log files located on SDDC Manager under /var/log/vmware/vcf/lcm. Check for VSAN Health warnings/errors in the vSphere Client. Resolve the issues and make sure that VSAN health is green in vSphere Client“, generally indicates a health issue in your vSAN cluster. Check vCenter and ensure the cluster is green before attempting restart the workflow, in this case a failed physical caching disk needed replacement, before the workflow could be restarted.
What do you do if you only have 3 hosts in your environment for vSAN and you cannot connect one host back to SDDC Manager because it didn’t like something in the host spec. Probably something got stuck during the upgrade to 4.3.
I couldn’t figure out where the host spec was.
But the big issue is that I can’t remove the host since the minimum amount of hosts is 3. Since it was a test envt, I tried changing the Postgres flags to allow the task to complete with no luck.
My only option to recover was to rebuild the workload domain.
Should I check the vCenter and use the steps here in that case – any other ideas how I could recover from this when I have prod workloads going?
Hi,
Firstly I would identify why the workflow failed and what about the host spec it didn’t like. If it was an upgrade and not a build to 4.3 you should have been able to identify issues during the pre-check.
If it was a build and you had to modify JSONs etc, you should have identified issues during validation.
Secondly, with the issue you should once again attempt to identify what the issue was and what has caused it. It doesn’t sound like a vSAN issue to me, was the host disconnected? Was vSAN still operational?
I can attempt to provide suggestions but would need more details from you.
Cheers!