
SSL Termination: Securing Web Traffic with NSX-ALB | LAB2PROD
Leverage NSX-ALB to encrypt your data with SSL Termination!
In this blog post we will cover the different ways to secure your web traffic using NSX-ALB. Those methods are; client-side SSL termination and server-side SSL Termination. We go one step further and configure port mirroring in NSX-T to replicate the load balancer traffic to see exactly what is going on!
Prerequisites
Before jumping into it, lets go through what will be required to replicate the content that is in this article yourself!
- NSX-T Data Centre deployed and configured, with dynamic routing
- NSX-T gateways and segments prepared for NSX-ALB; Avi Integration with NSX-T
- NSX-ALB deployed and configured.
- A virtual service that has a pool with web servers attached
- Certificate Authority deployed and configured, this guide will use Microsoft Active Directory with web enrolment
- Web servers deployed
- A virtual machine with WireShark installed, that can be connected to the NSX-T Segments
- Active Directory Sites and Services configured with the new subnets
- DNS zones and records configured for the VIP and web servers
Lab Topology
NSX-ALB Virtual Service Diagram
Below is an image that shows a basic overview of the client, Avi Service Engines and webserver setup.
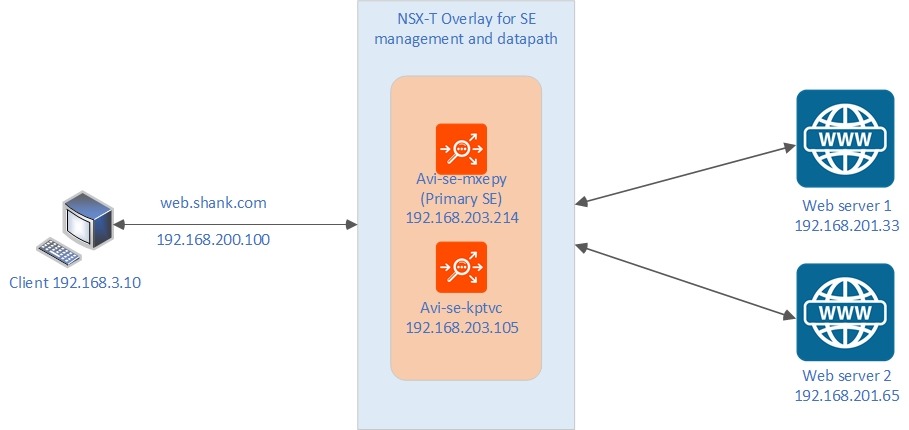
- The client sits on VLAN outside of the NSX-T domain
- The NSX-ALB service engine that is not marked as primary has a management interface that sits on an NSX-T Overlay Segment, which is propagated via BGP
- The primary service engine has two interfaces, one in the same management overlay segment and a second one that is used for it’s data-path.
- The web servers also sit on an NSX-T Overlay segment propagated via BGP, this segment is separate to the data-path segment attached to the Service Engines.
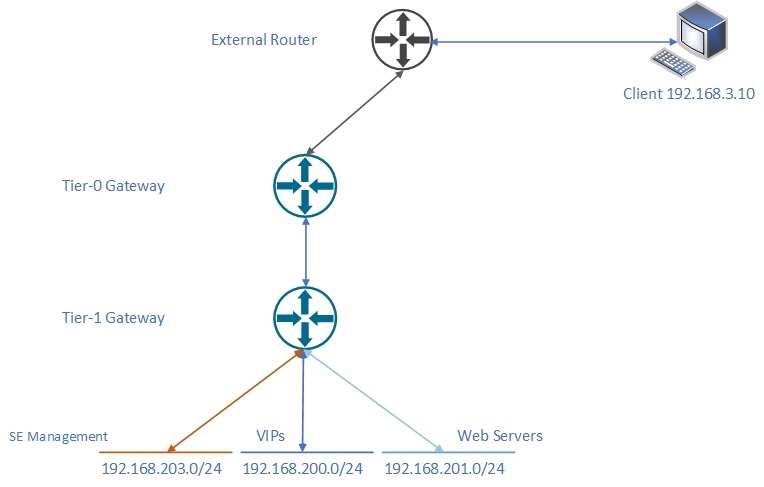
Logical Network Diagram
The diagram below should clarify the network topology for this article.
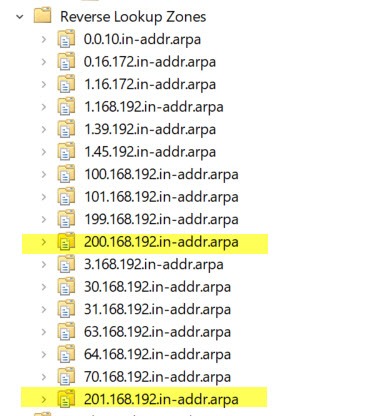
DNS Configuration
As mentioned in the prerequisites, you will need to configure DNS Reverse Lookup zones and A records.
In this lab environment, I have the below A records configured.

- Web 1 and Web 2 are the web servers
- Web is the VIP
The image below highlights the DNS reverse lookup zones that have been created. Note, in this article I am not actively utilizing the 192.168.201.0 reverse lookup zone. It has been created for future use, if you wish to do so as well.
Inspecting Unencrypted Traffic
Getting the basics working
Rather than moving straight into the configuration of SSL Termination (will be covered in the coming sections). It seemed like a good idea to show why anyone would bother in the first place. What better way to show this than with some packet captures!
You may be asking the question, why are we using packet captures and not NSX-ALB’s native traffic cloning? That is due to the fact that at the time of writing this article, traffic cloning is not supported with NSX-T Cloud in NSX-ALB. Therefore we utilize NSX-T to achieve the same outcome.
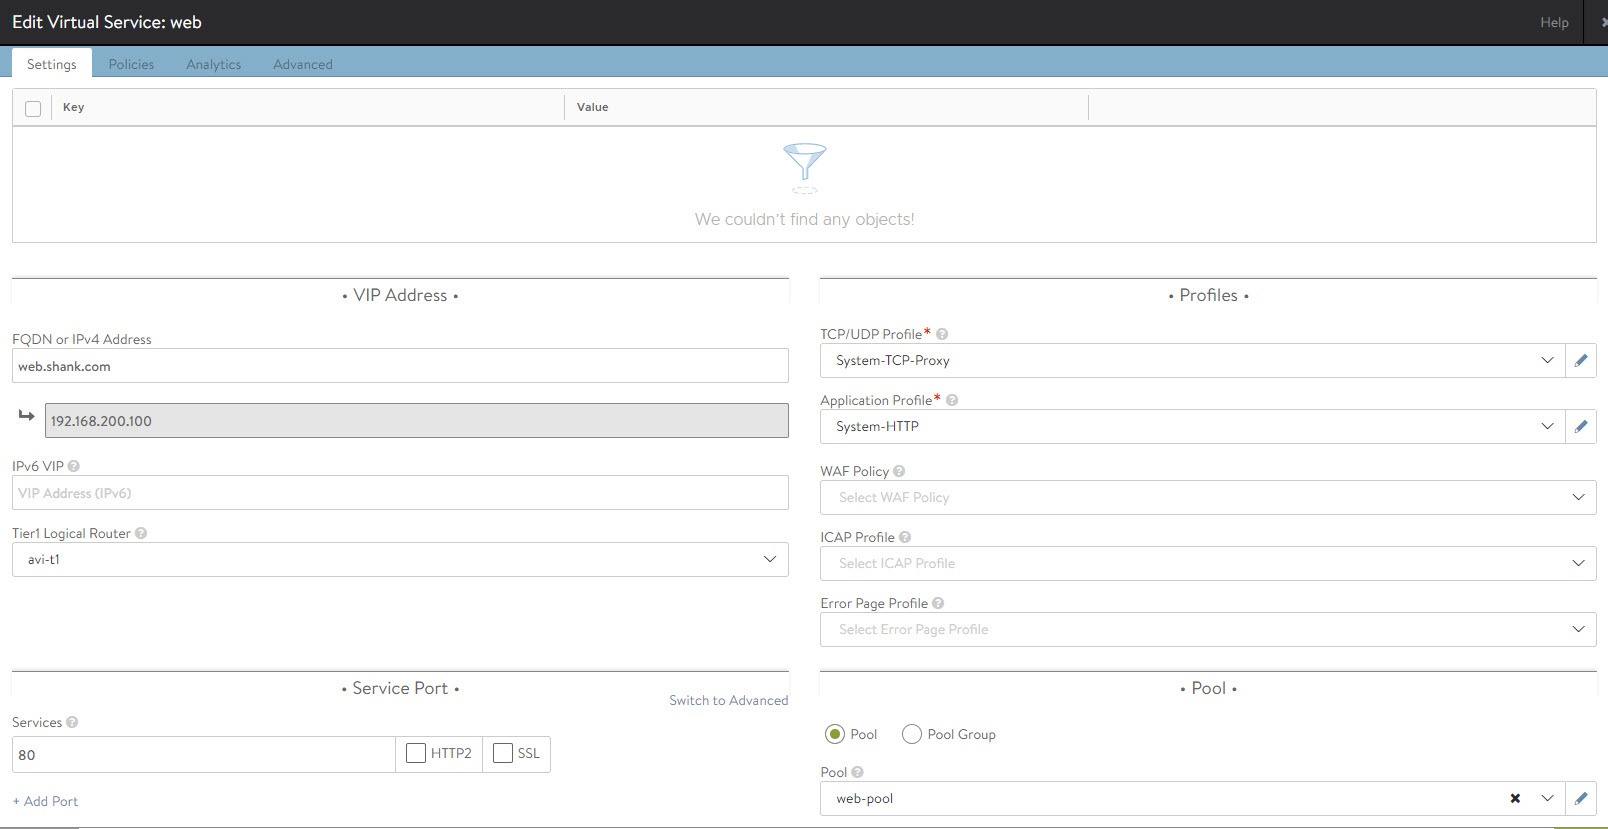
In order to be able to complete this, you should already have a virtual service with a pool of web servers attached. The image below displays the basic settings required for the virtual service.
After saving the configuration, if all has been configured correctly, you should now be able to access the VIP or FQDN. In this case web.shank.com or 192.168.200.100.
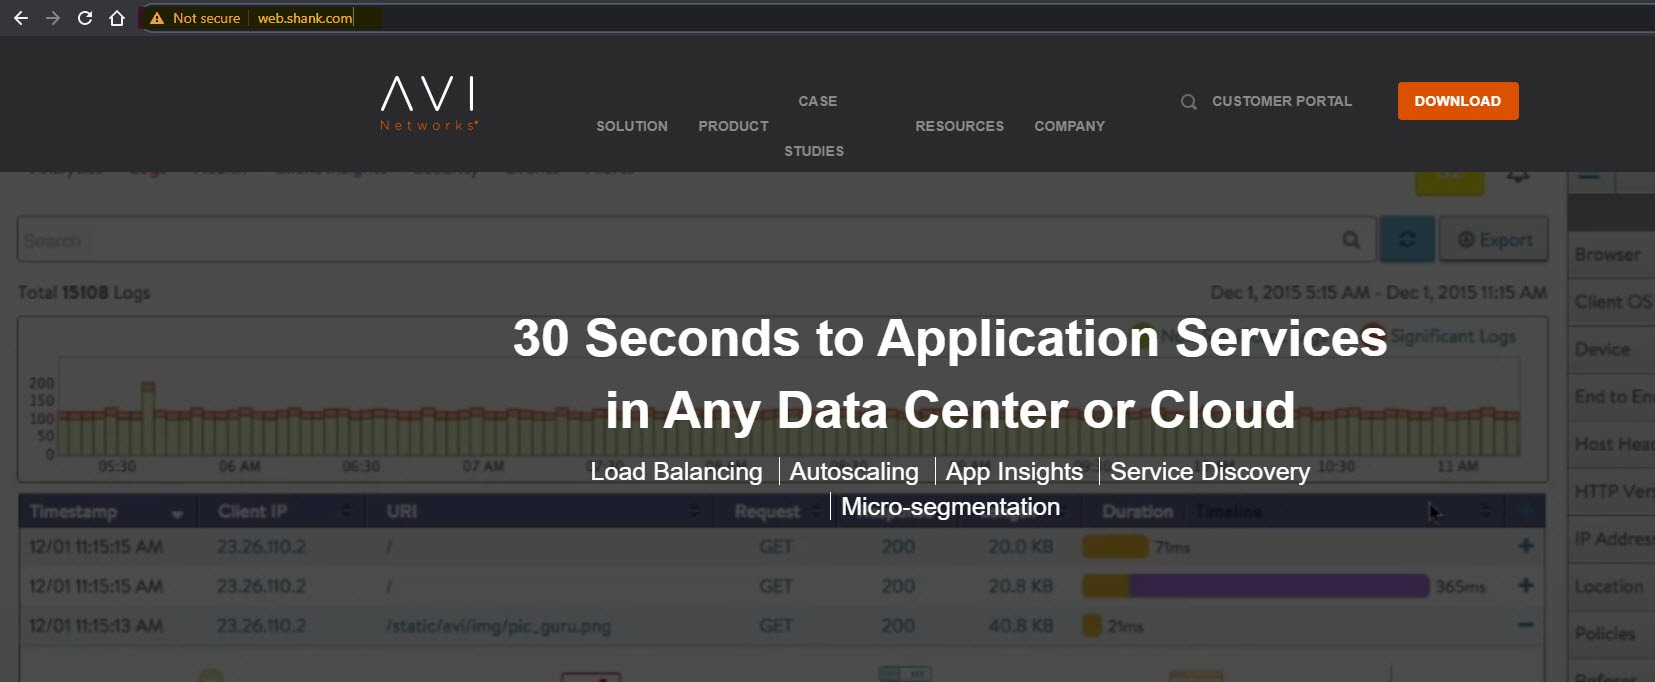
Success! Our virtual service is working, have a look at the URL bar, notice it is an unsecured connection with plain HTTP.
In the next section we will inspect the packets to have a look at the HTTP communication.
Configuring NSX-T Port Mirroring
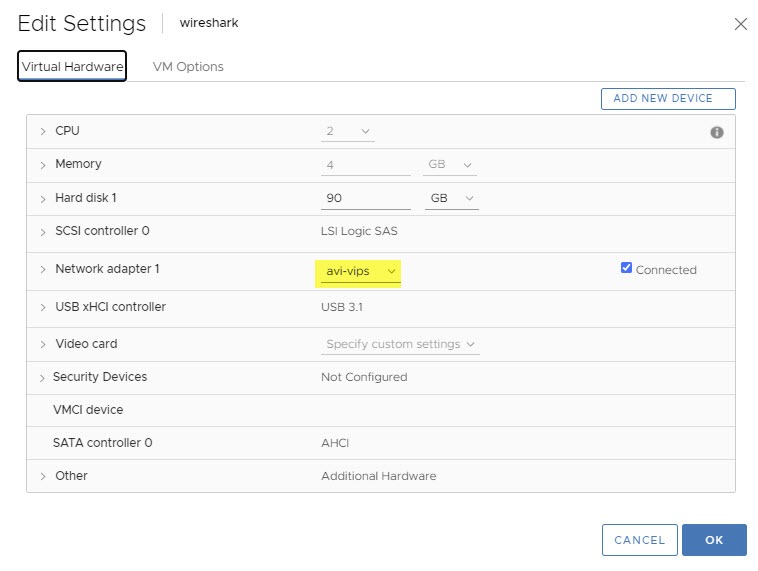
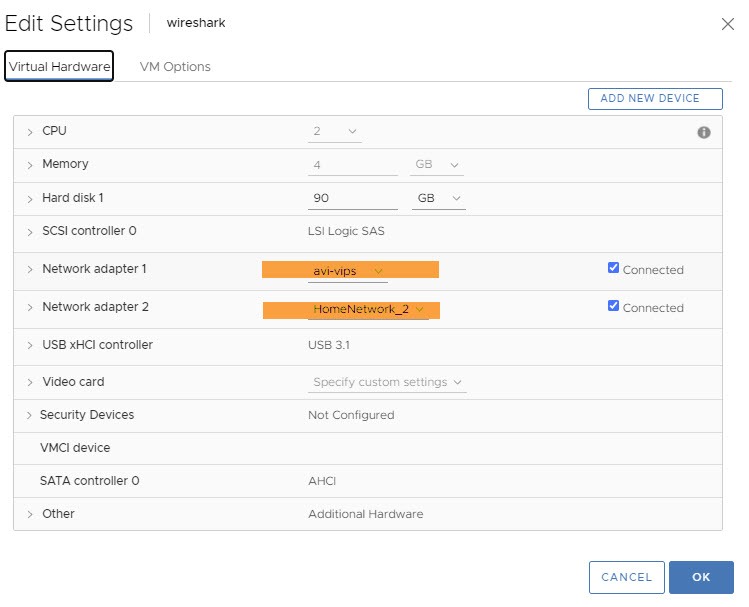
This is where we will utilize the virtual machine with WireShark on it. Let’s jump into vCenter and attach this VM to the NSX-T Segment that our VIP sits on.
Next log into NSX-T Manager and navigate to the Plan & Troubleshoot tab. This is where we will create the port mirroring session. This will replicate the data on the primary service engines data-path logical port, to the WireShark virtual machine. This will allow us to see the traffic between the client, VIP and web servers.
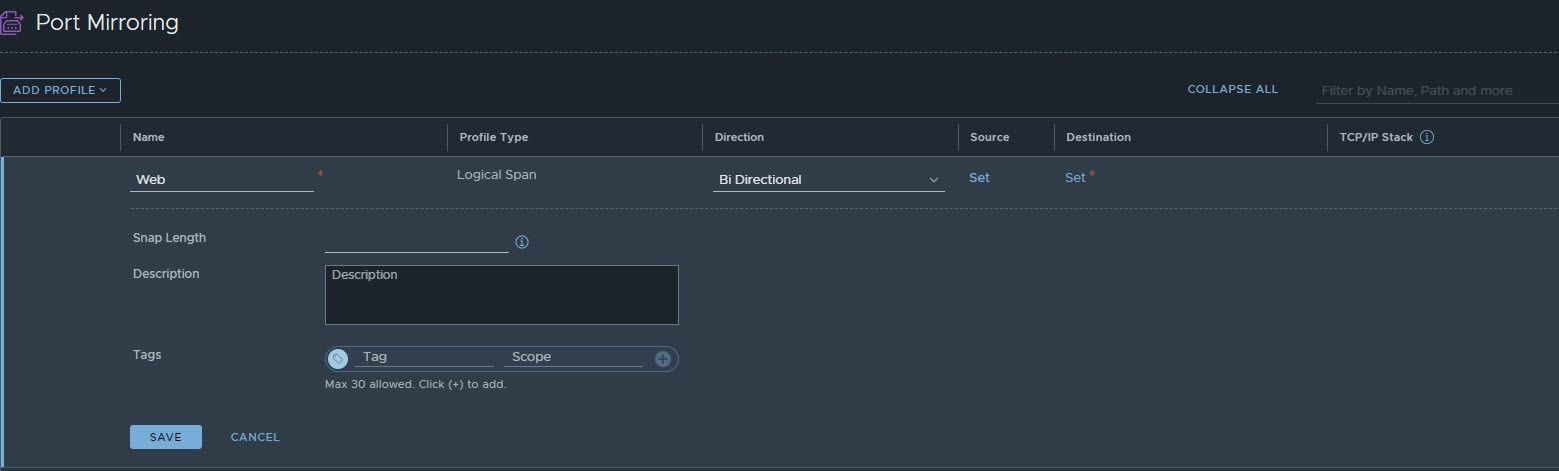
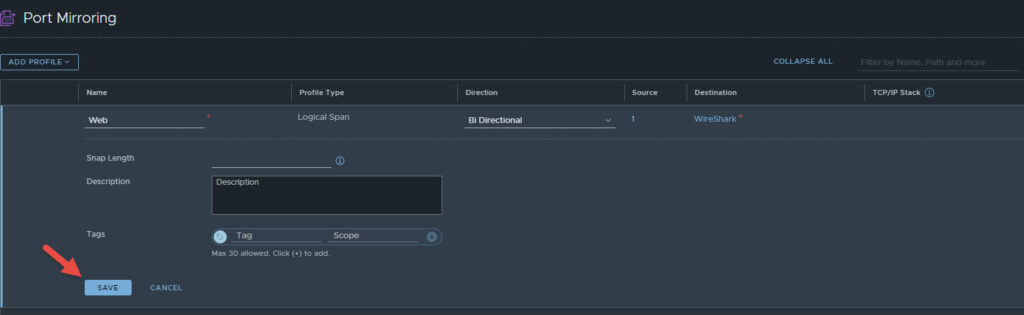
Click on add profile, in this example we are going to be using logical span, so select that. Give the session a name, similar to the below image. Select Bi Directional, so we can see ingress and egress traffic.
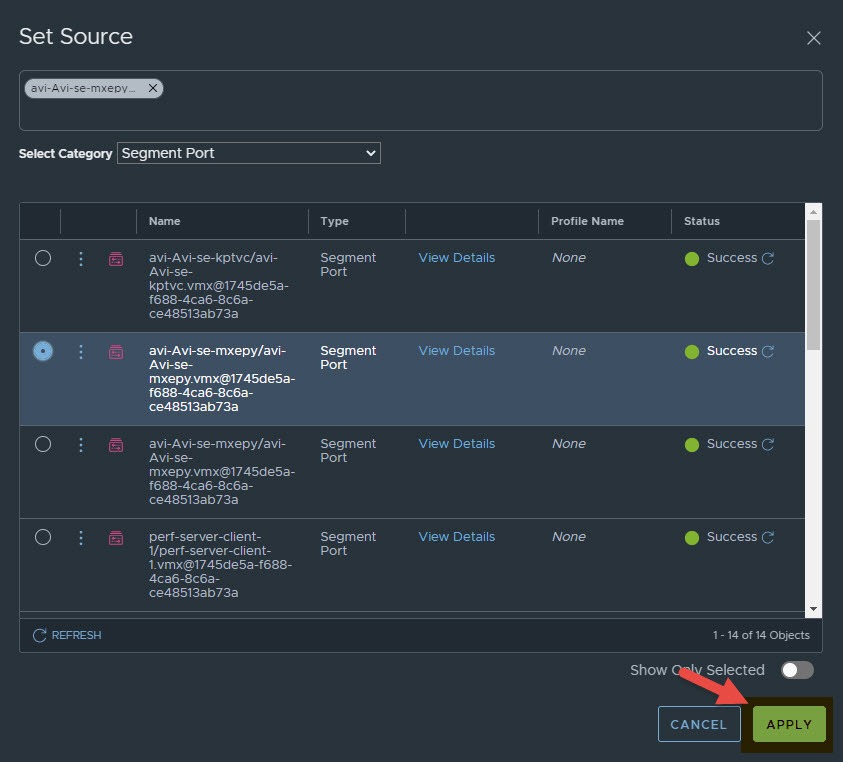
Next we specify what port we are mirroring and where it should be mirrored to. Start by clicking on set underneath the Source column, this lists all of the logical ports NSX-T currently has. From this list you want to select the data-path logical port on the primary service engine.
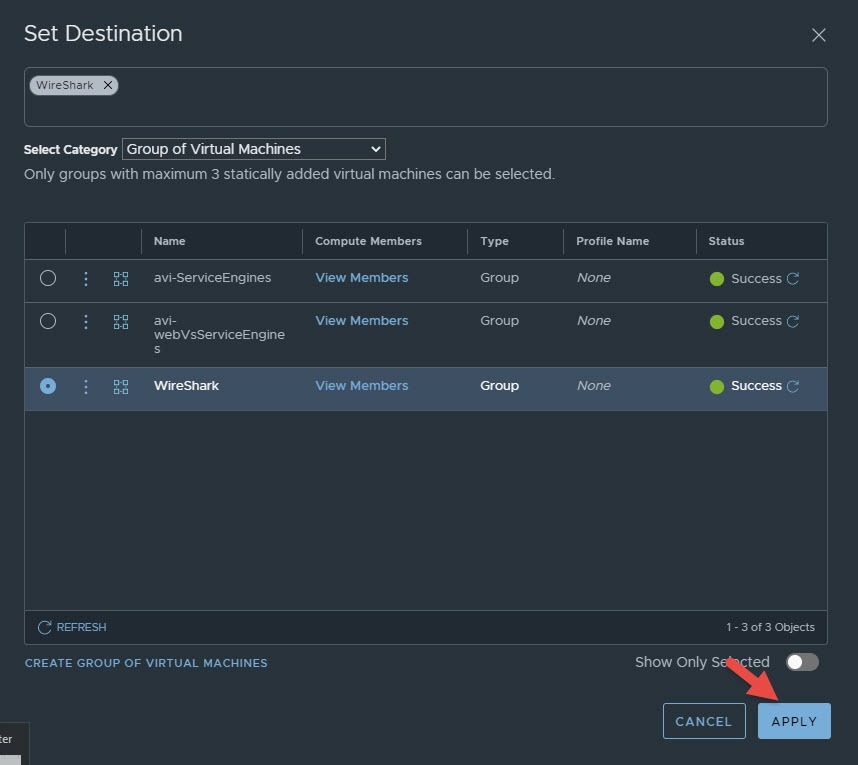
Now click on set underneath the Destination column, the destination is a group of virtual machines. If you have not yet got a group for your WireShark VM, click on create group of virtual machines at the bottom. Give the group a name and select the WireShark VM as a member. Then select this group as the destination and click on apply.
You should now see the below screen, click save to complete.
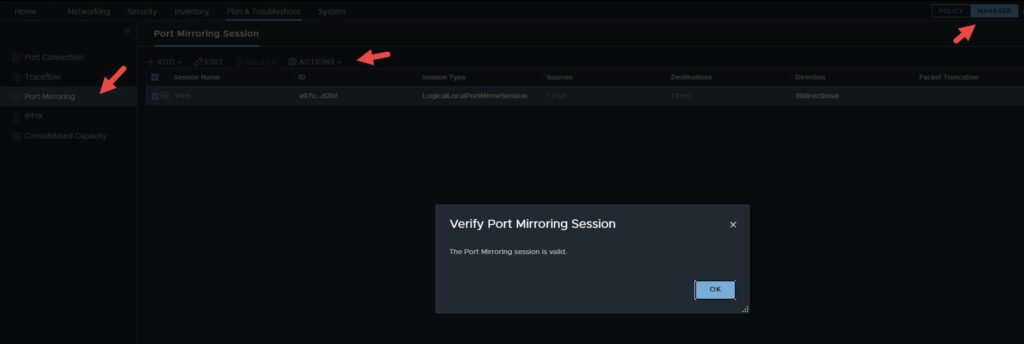
You can verify the port mirroring session by switching from policy to manager view in the top right (if you are running the latest version of NSX-T). From the Manager view click on Port Mirroring, then check the box next to the session you just created, select actions, and then click on Verify Port Mirroring Session. You should see the screen below.
Capturing Traffic on WireShark
Now that the port mirroring session has been created and verified, all data traversing the logical port of the service engine should now be visible on the WireShark VM. This means we can now inspect the traffic using WireShark on this VM. Something to note here is, the vmnic or port that you are replicating traffic to will not have an IP address assigned to it. You have two options here, use the console or multihome the VM. The latter will be used in this article, which means the VM can be RDP’d to. You will need to ensure the VM gets an IP address on the second NIC and is reachable.
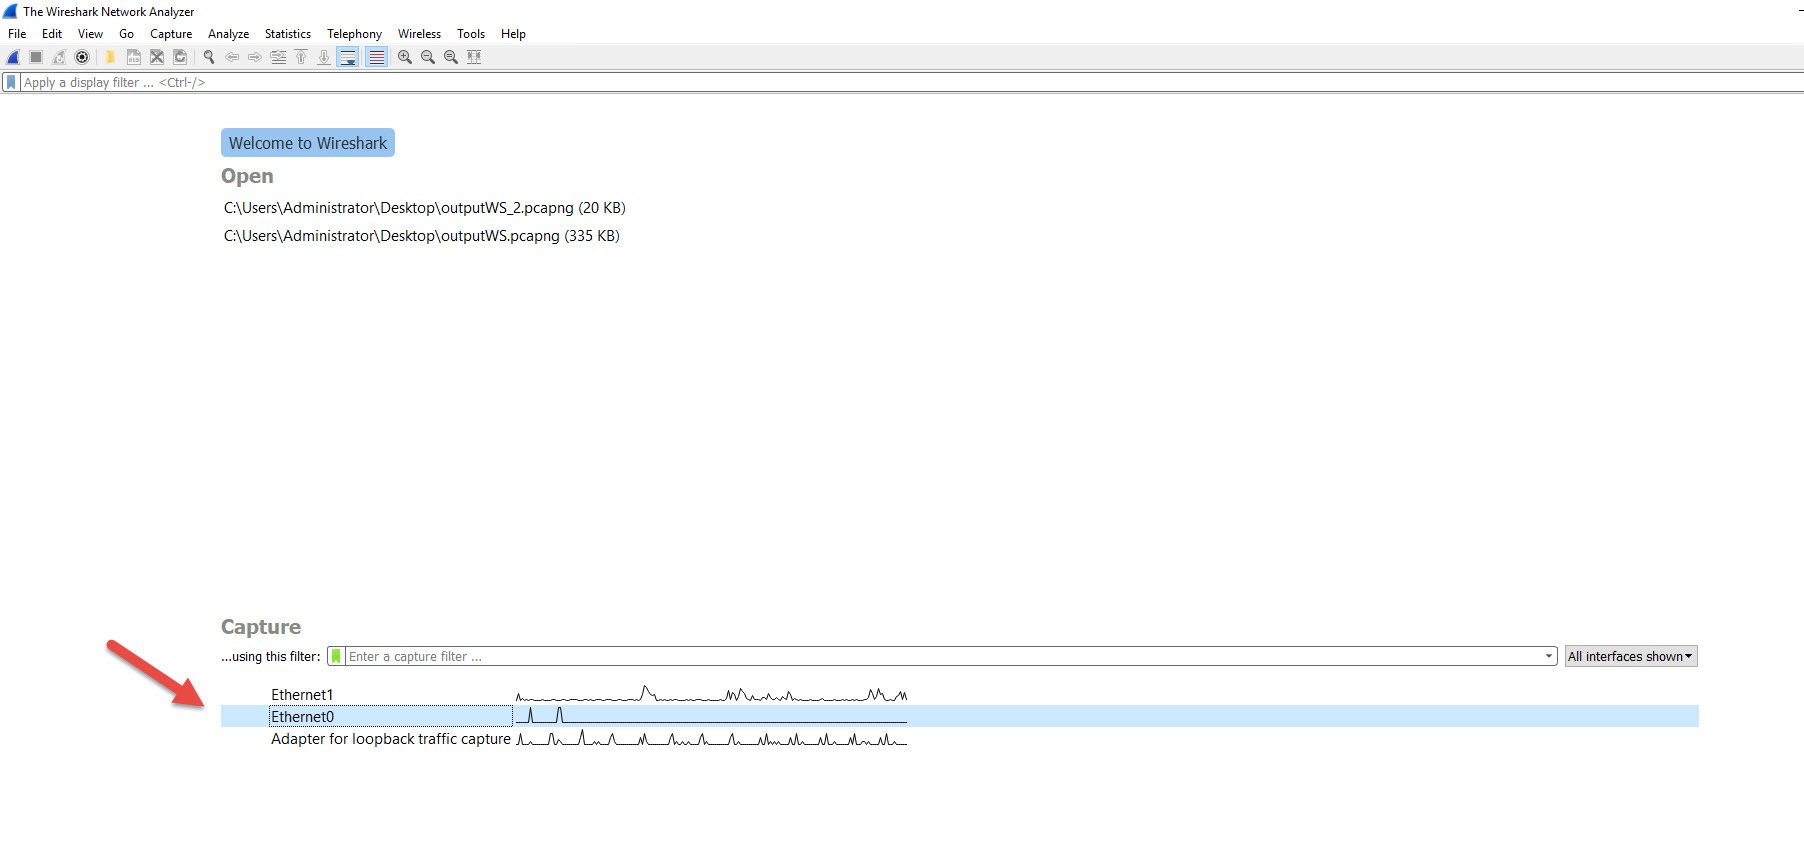
Next, RDP onto the VM and fire up WireShark. Make sure you are capturing traffic on the correct interface or else you will just see a whole lot of RDP packets and whatever else is on the second interface. In this case, the correct interface is Ethernet 0. If you want to check, open up command prompt and type in ipconfig /all. The name of the adapter will be listed in the output.
Double click on the correct interface and it should start a capture session.
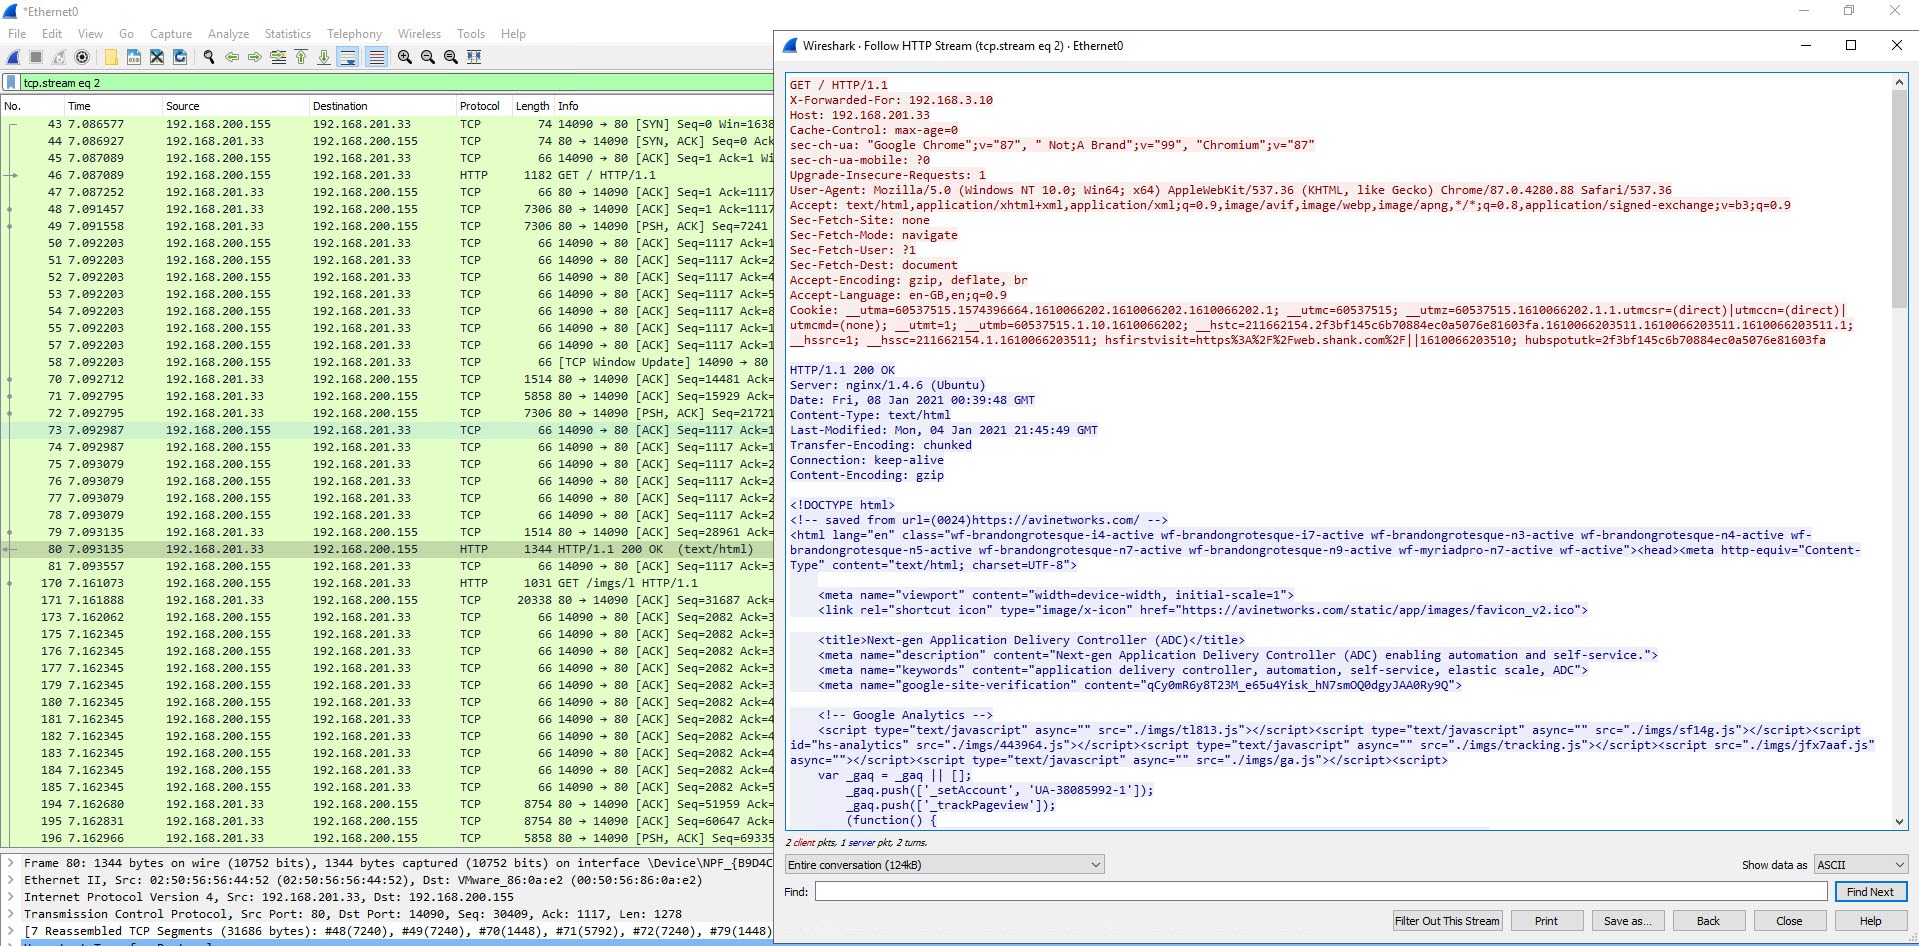
You may or may not see any data until you start hitting the VIP. Now open up a browser on a client that can reach the VIP / FQDN and try and resolve the page. To get a bit more data refresh the page a couple of times. You should now see a similar output to the below in WireShark.
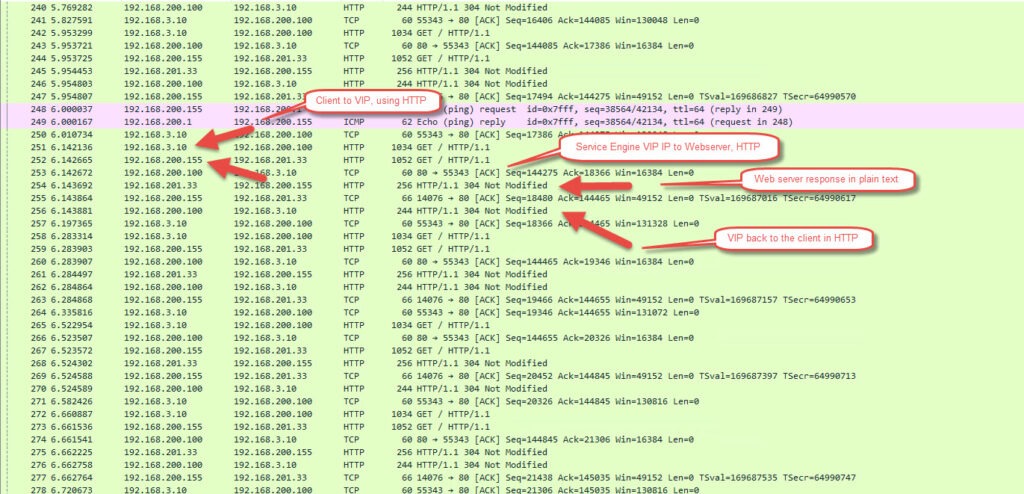
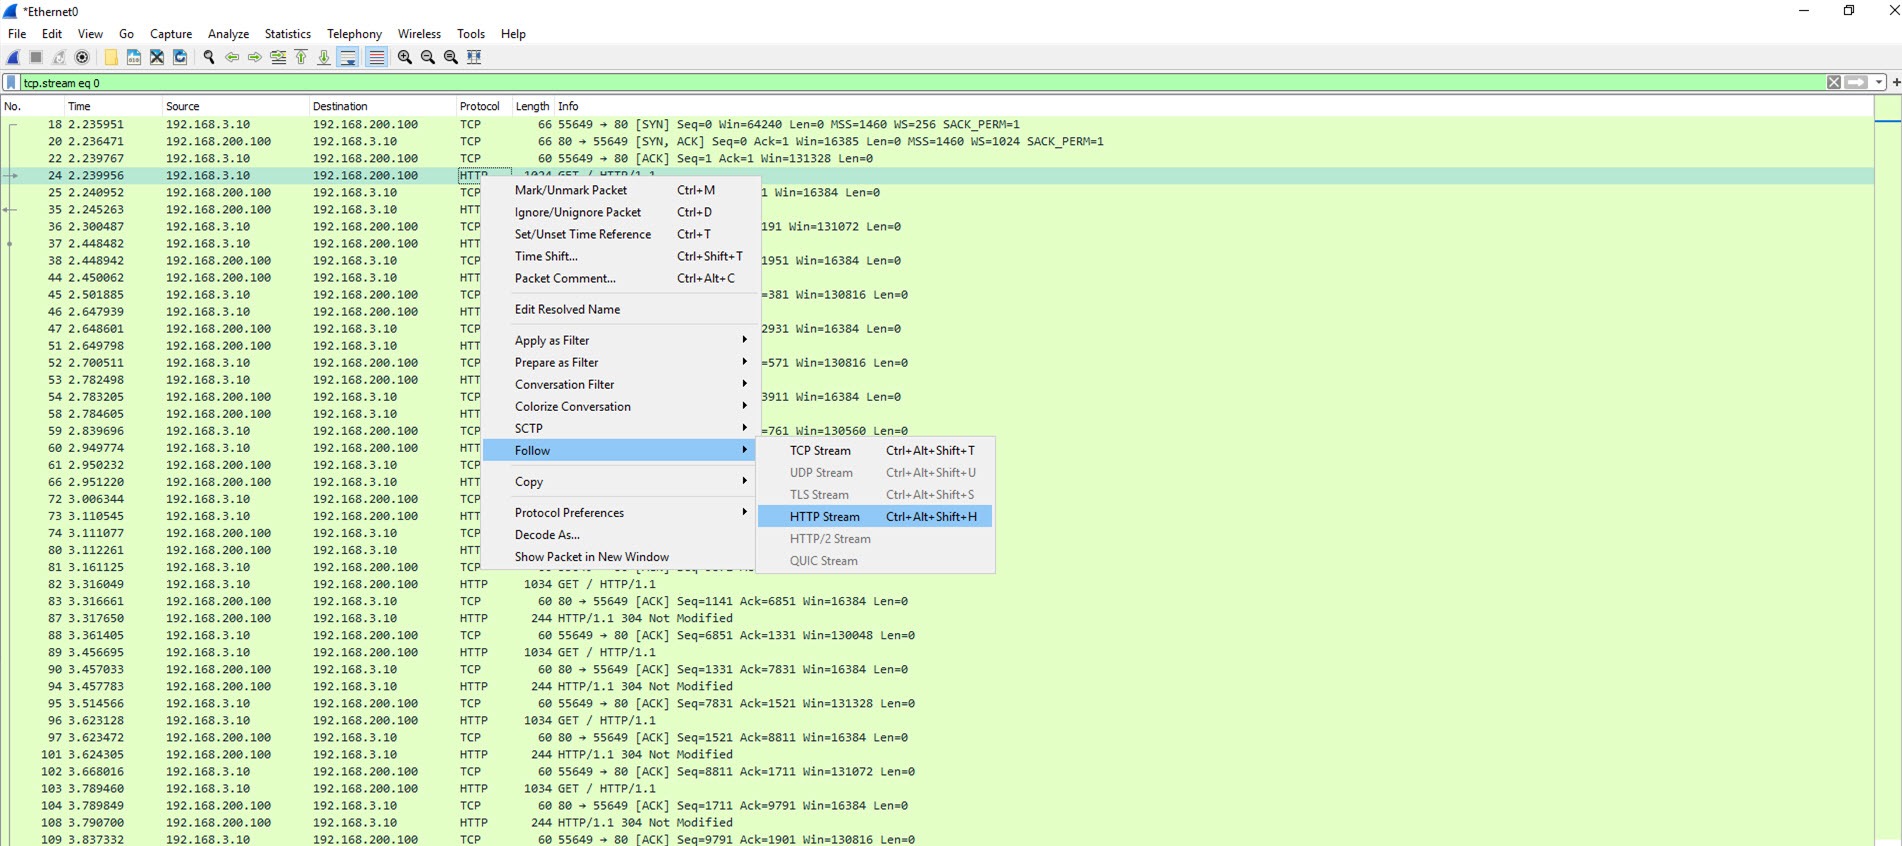
If you find the first GET request, right click, follow and then follow HTTP stream you will be able to see data from the connection stream.
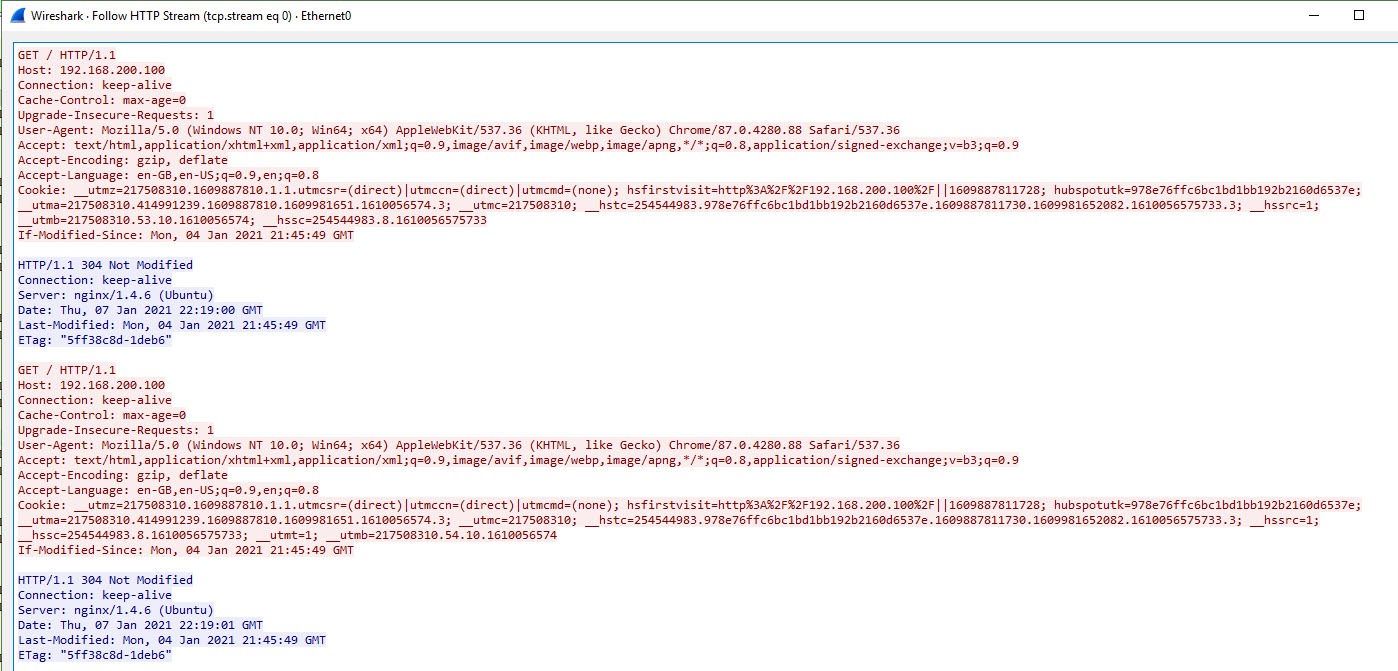
Below is the output in plaintext.
NSX-ALB: SSL Termination
In order to prevent plaintext communication to and from the web servers, you will need to encrypt the traffic. NSX-ALB has SSL termination capabilities. This is where a certificate authority and certificates will be required.
There are three methods to achieving this:
- Client-side termination
- Server-side termination
- A combination of both
Further information can be found here; AVI Documentation.
CSR’s, Certificates and Enrolment
Generating a CSR in NSX-ALB
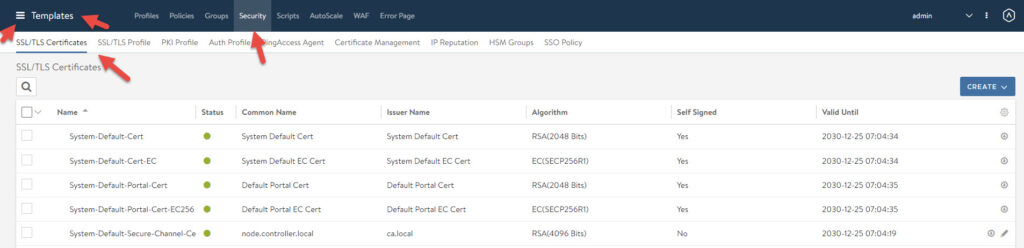
Log into NSX-ALB, click on the 3 lines in the top left, click on Templates, and then Security. You should be in the SSL/TLS Certificates Tab.
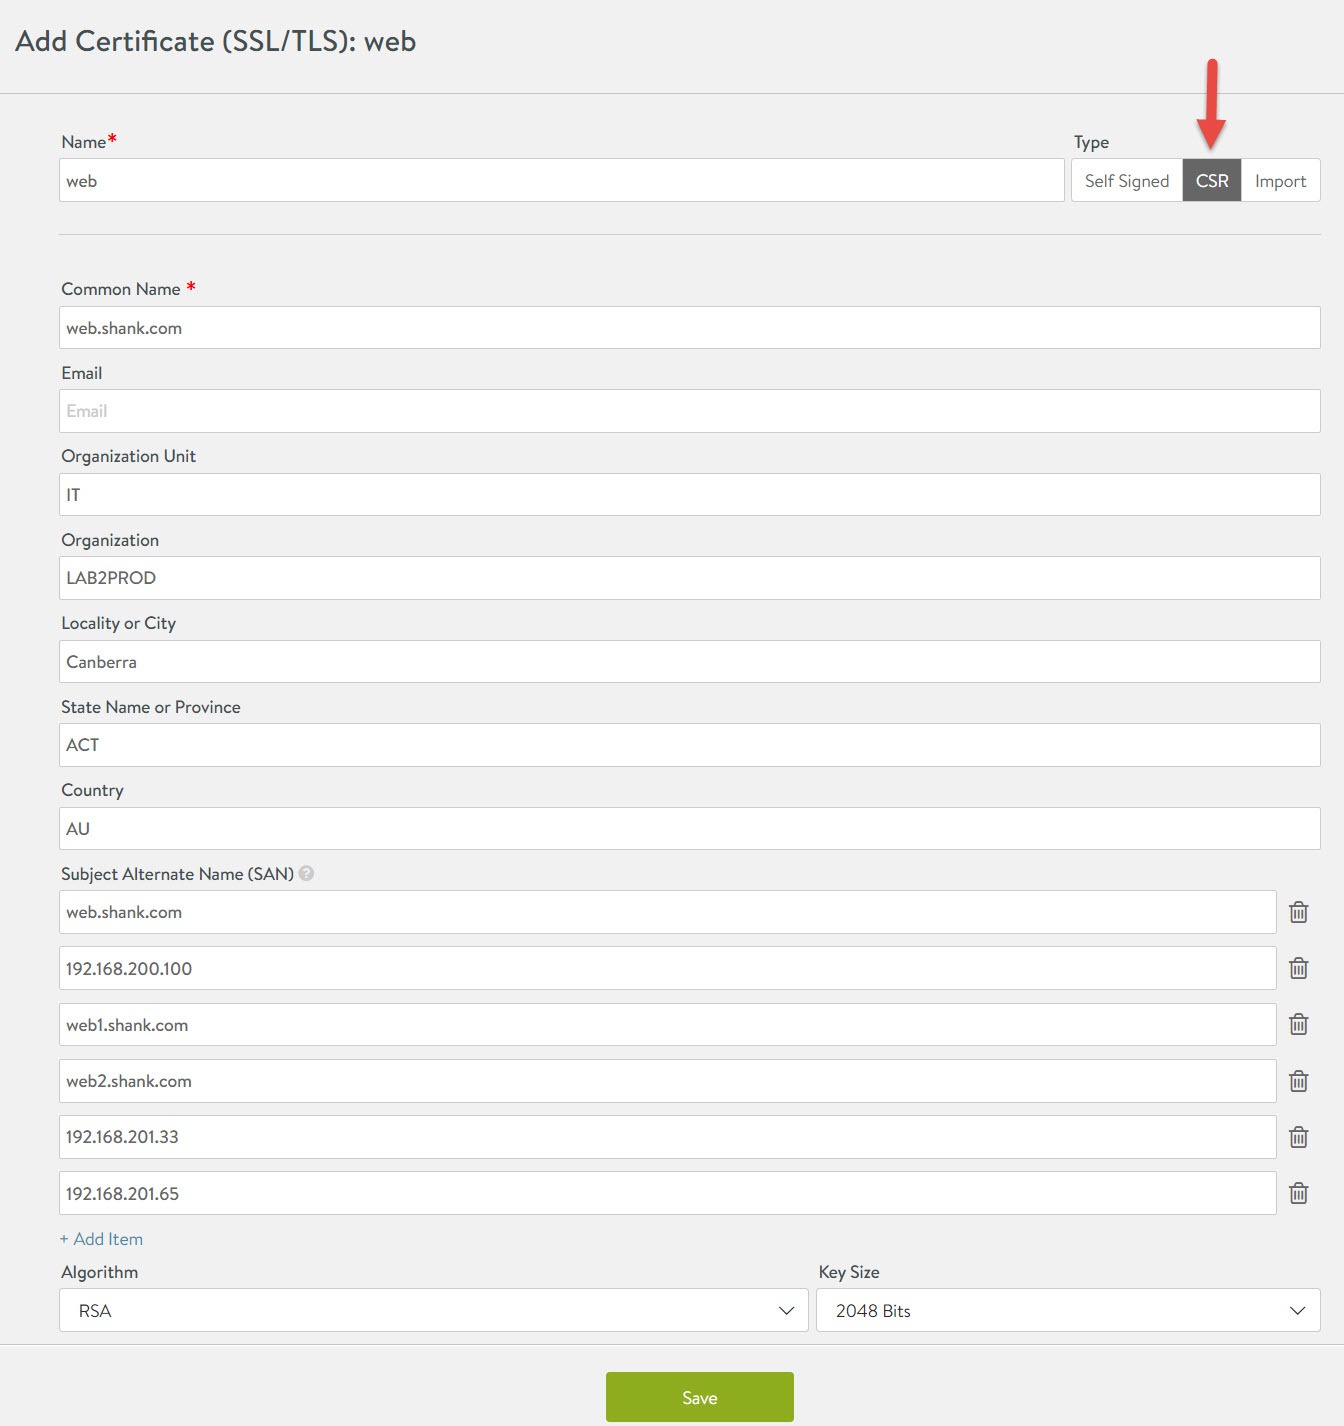
Click on the create button in the top right, select application certificate. You should now see the window below, ensure you select CSR and fill out the details as required. Click save once complete.
You will be returned the previous screen like below. Click the little pencil button next to your new CSR and copy the certificate signing request using copy to clipboard.
Paste the output into a text document.
Active Directory Certificate Authority – Web Enrolment
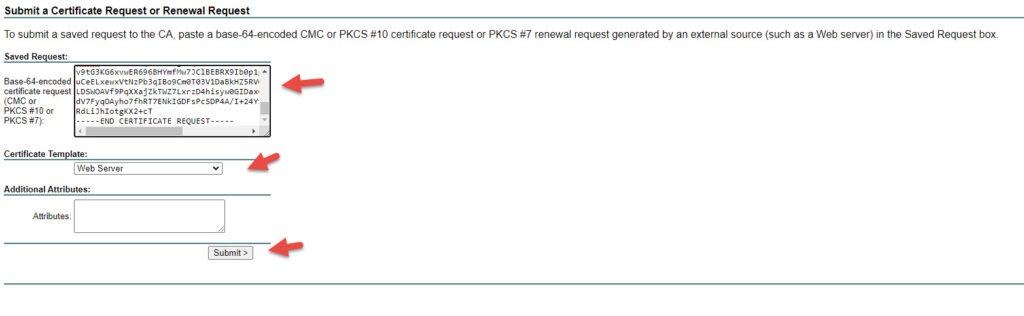
Using the CSR that was just created, you will now need to generate a certificate from it. Using a client that has access to the CA, use a browser and navigate to <CA_FQDN/crtsrv>, when prompted, enter credentials with rights to the server. Click on Request a certificate, click on advanced certificate request. In the next section, paste the output in the text document from earlier, and change the template to Web Server. Click Submit, once you are done.
On the next page, download the Base 64 encoded certificate.
Obtaining the Active Directory Root CA Certificate
This document will assist in obtaining the root CA certificate. Once you have the certificate, copy the certificate contents to a notepad document.
Importing the Root CA Certificate into NSX-ALB
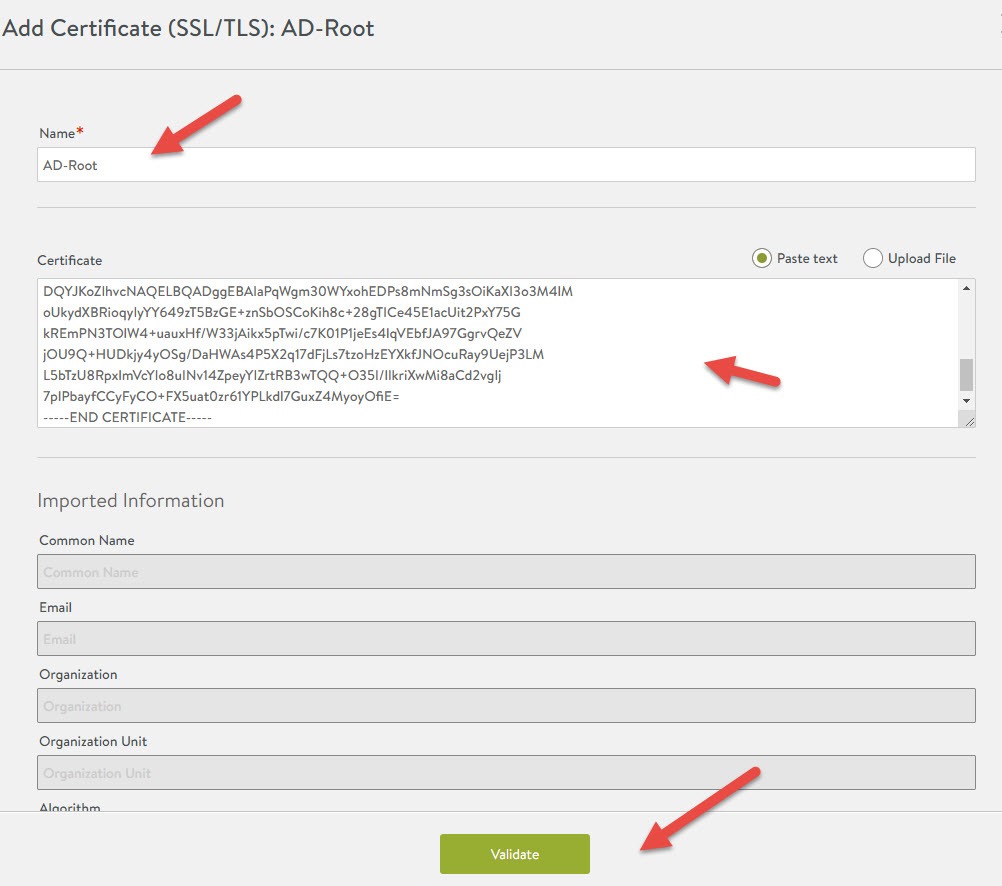
Navigate back to the SSL/TLS Certificates section in Security. Click on Create, select Root/Intermediate CA Certificate.
Fill in the fields like the example below and then select validate.
After clicking validate, the button will change to import. Click on import and the certificate should now be imported with a green status light.

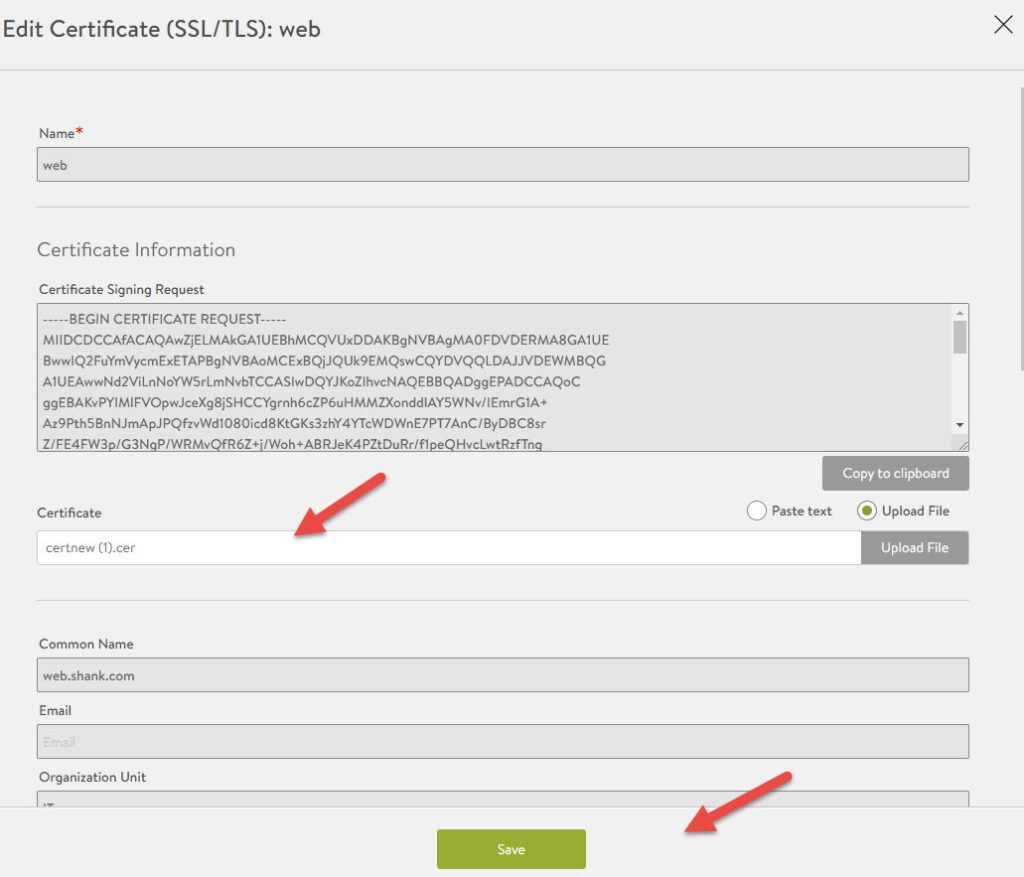
Fulfilling the Web Server’s CSR
In the SSL/TLS Certificates section, find the web CSR that was created earlier. Click on the pencil icon on the right side of it, click on upload file, and select the certificate that was downloaded earlier. Click Save once complete, once again the status light should be green.
Configuring and Testing Client-Side SSL Termination
HTTP to HTTPS Redirect Profile
As part of encrypting client-side traffic, you will also need to redirect any HTTP traffic to HTTPS. Click on the 3 lines and select templates. Click on create. In the new window, give the application profile a name, then click on security.
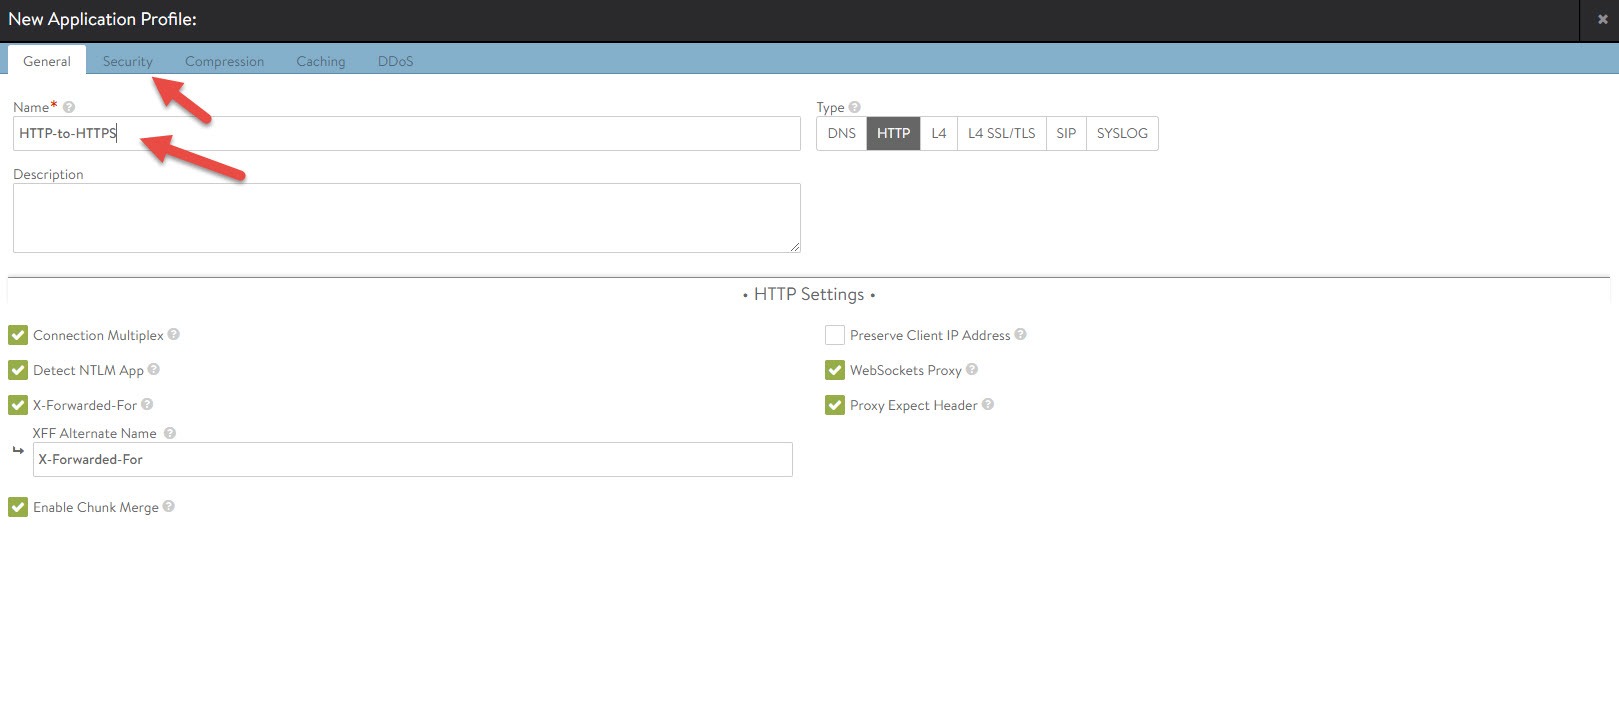
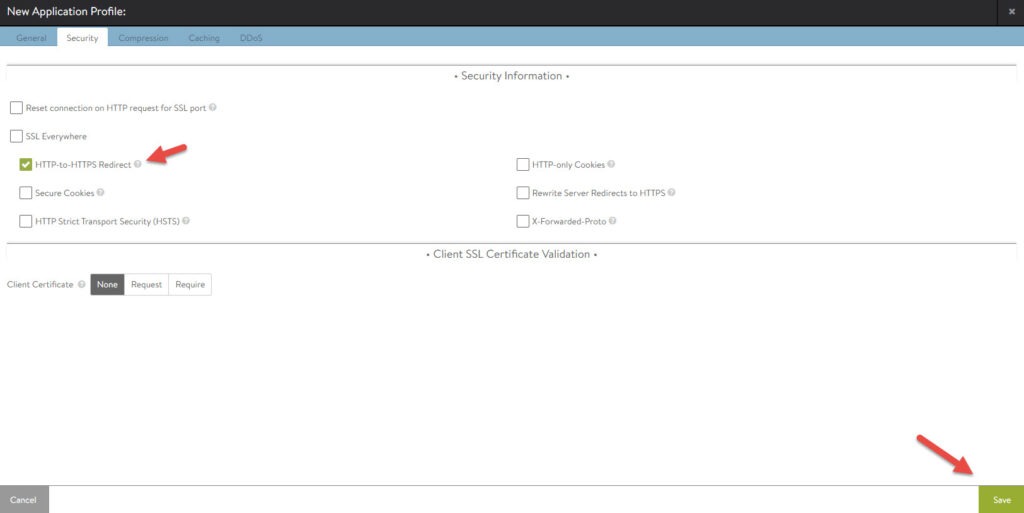
In the security tab check HTTP-to-HTTPS Redirect and click save.
There are other methods of redirecting traffic and they can be found here.
Configuring the Virtual Service
Navigate to Virtual Services by clicking on the 3 lines and selecting Applications, then click on the Virtual Services tab. Select the virtual service that you want to configure client-side SSL termination on and click edit.
You will see the screen below, change the Application Profile to the one you created earlier for the redirect. Scroll down to the Service Port section, click on add port, enter 443 and check SSL. After you click check SSL, the SSL settings will appear in the bottom right corner, select System-Standard for the SSL Profile (unless you have a modified one). Under SSL Certificate, select the certificate you imported earlier. Click Save, once you are done.
Now navigating to web.shank.com or 192.168.200.100 is redirected to https://web.shank.com.

Log back into the WireShark VM and lets have a look what the packets look like with this configuration. As can be seen below, packets from the client to the service engine or VIP are now encrypted, if you repeat the procedure earlier and follow the stream, you will not be able to see any details.
However, if you look further in the packet captures, the traffic between the virtual service and the web servers is still unencrypted.
Configuring and Testing Server-Side and Client-Side SSL Termination
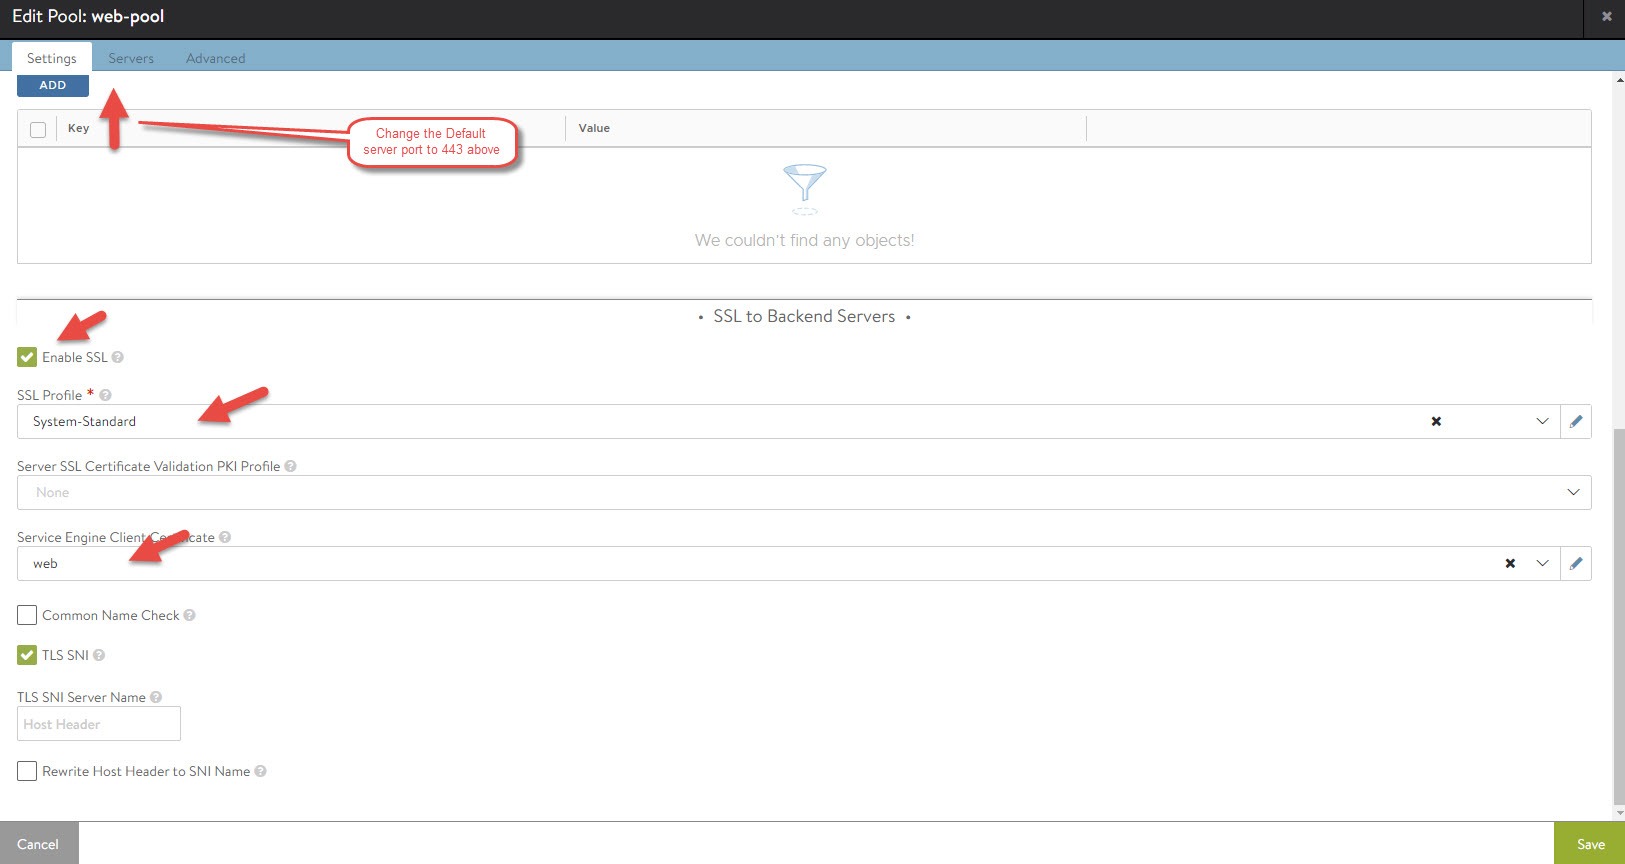
In this section, we will continue from where we left off with client-side termination and add in server-side termination. This is so that traffic to and from the VIP and backend servers is encrypted.
In NSX-ALB, navigate to Applications, and then click on Pools. Edit the pool you are using for the virtual service, change the Default Server Port to 443. Scroll down to the bottom and check Enable SSL. Click on the SSL Profile field and select System-Standard (unless you have another profile you want to use). Select the web server certificate you imported for Service Engine Client Certificate. Click save once you are done.
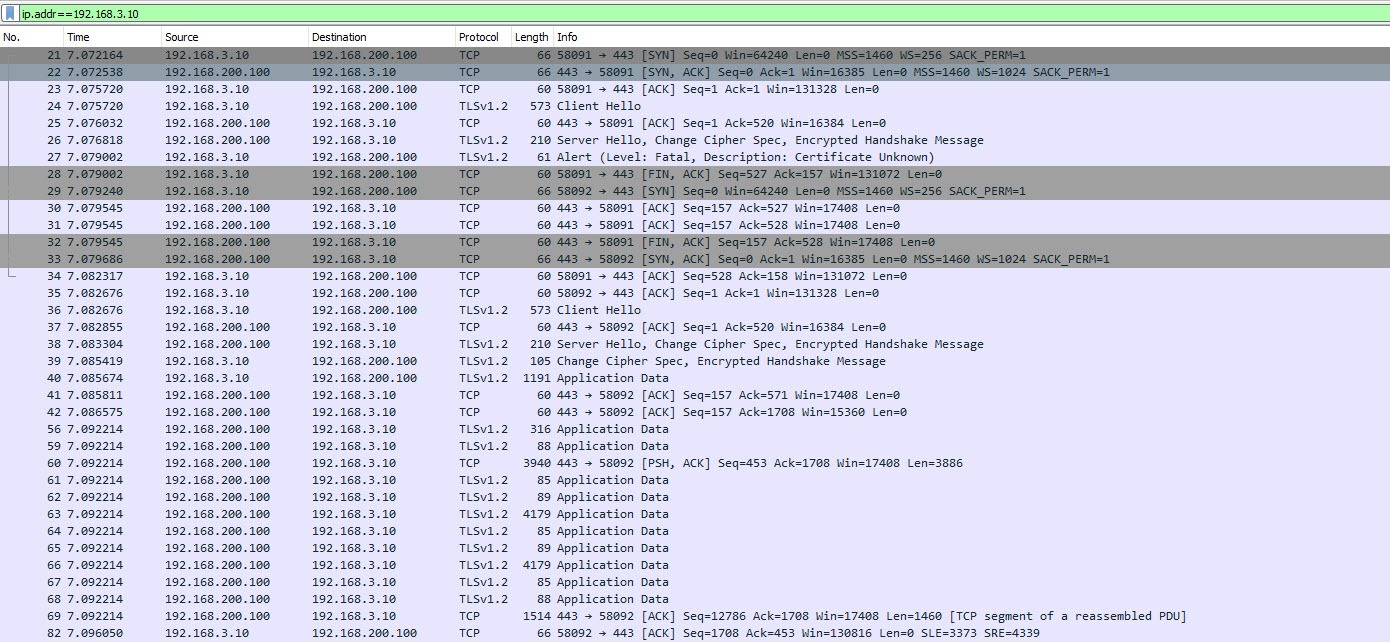
If we check the packet capture now, you won’t see any HTTP traffic and should only see what is in the below image.
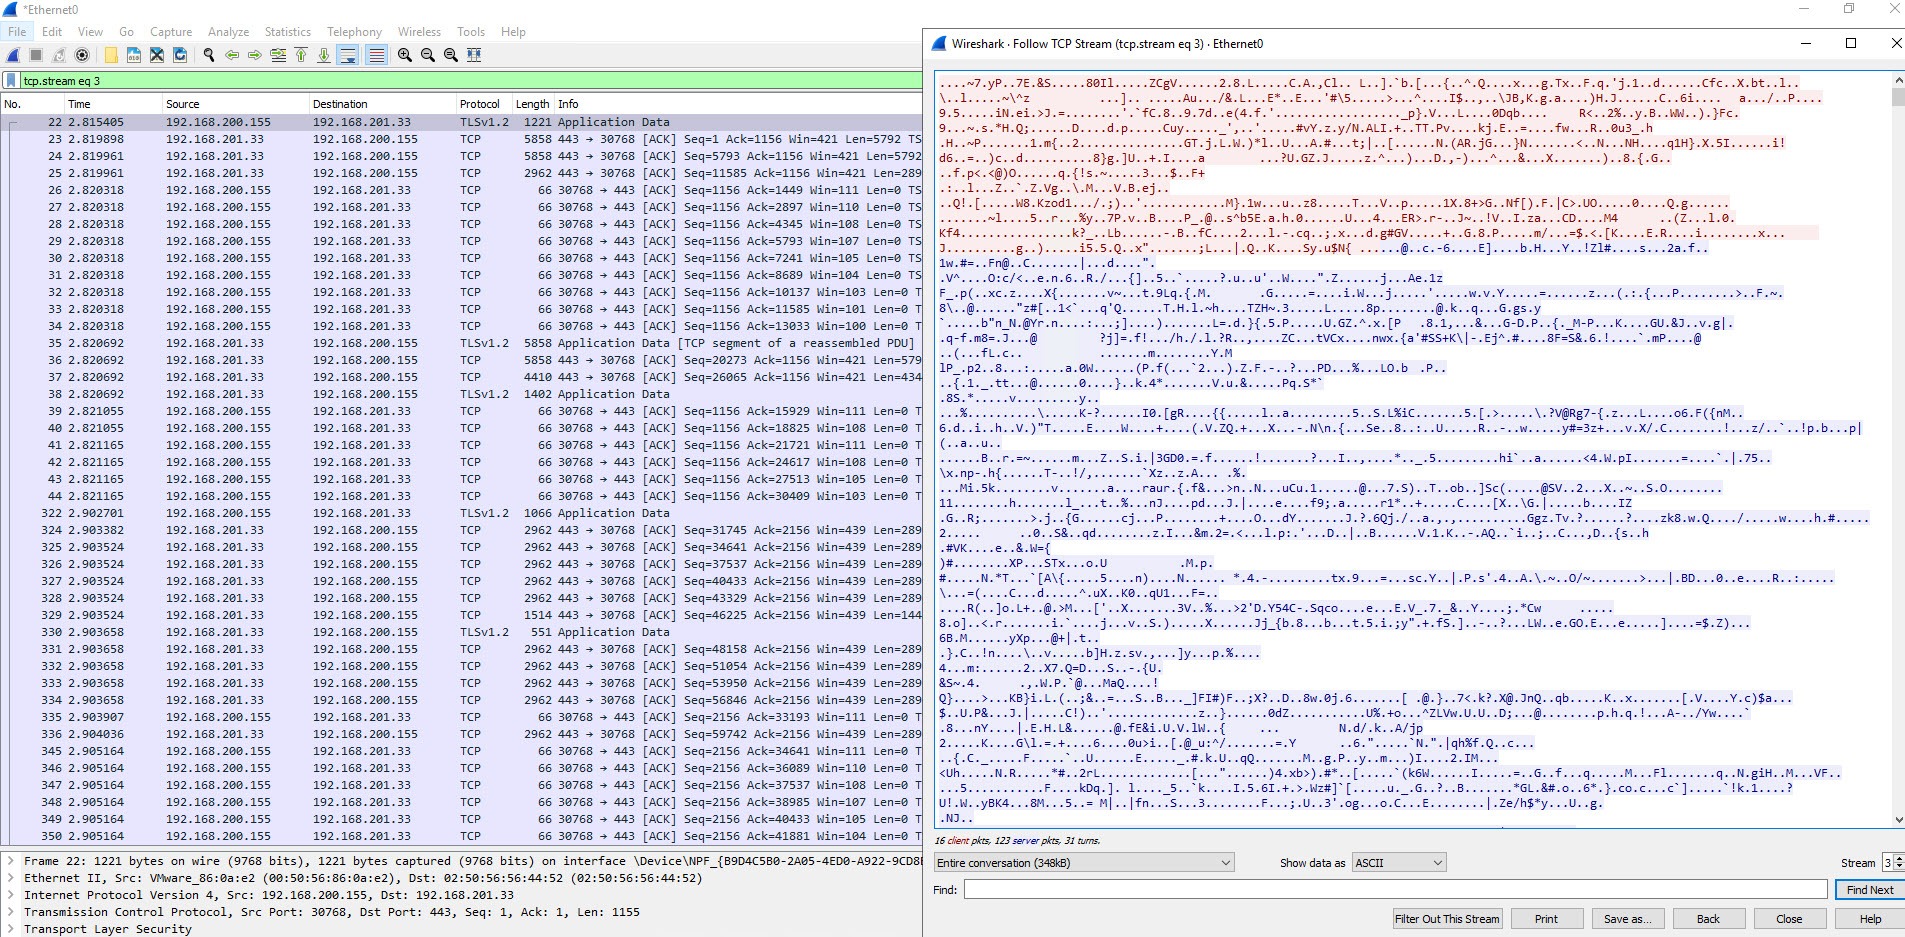
In the image below you can see the client making the request, it hitting the virtual service IP. From there the service engine communicates with the backend servers, and then data is returned to the client. All of this is now encrypted!
Conclusion
You should now be comfortable with configuring SSL Termination with NSX-ALB. What is more important is, you should now know why one would want to configure it in the first place! Keep in mind there are pro’s and con’s to everything, there may be performance impacts with certain methods. However, in this day and age, I dare say everyone would like some security and encryption!
Given what you have seen here, you may be interested in applying this to a GSLB service. My previous article on how to configure a GSLB service in NSX-ALB can be found here; Multi-Cloud Load Balancing using NSX-ALB.
If you have any questions feel free to leave a comment!