
Building a Multi-NIC VCF 4 Workload Domain using API | LAB2PROD
Using API to create a VMware Cloud Foundation (VCF) multi-nic workload domain
In this article we will cover building a VMware Cloud Foundation (VCF) Workload Domain using API calls for hosts with multiple physical NICs (multi-nic). Postman was used in this article, however the same commands can be used directly on SDDC Manager or any other appliance that can issue curl commands. This is a slightly different take to using PowerVCF, as some environments do not allow additional PowerShell modules to be installed or internet access for management workstations.
When deploying either a management or workload domain in VCF 4 and above with multiple physical NICs (more than two, generally 4), two vSphere Distributed Switches are created. The first is reserved for management traffic, which will be your management VM Kernel, vSAN and vMotion. Attached to this switch will be two physical NICs used for uplink to the physical network. VCF will configure them with the appropriate load balancing policy.
The second vSphere Distributed Switch is reserved for NSX-T Datacenter, once again in a multiple physical NIC scenario, two of the physical NICs will be attached to this switch and the teaming policy within NSX-T transport node profile will be set to load balance source and applied accordingly. All traffic that originates from the NSX-T domain will pass across this switch and these uplinks, that is your overlay and vlan backed traffic.
To begin make sure the hosts that will be used for the Workload Domain are prepared, this involves having them built with an image from the hardware vendor that has all supported drivers for the build of VCF that you are deploying. In this article I will be building them for VCF 4.0.1, the BOM for this version can be found here.
For this article VMware Imaging Appliance (VIA), which you will have access to after deploying VMware Cloud Builder, will be utilized.
Configuring Cloud Builder and Imaging Hosts to prepare for the Workload Domain:
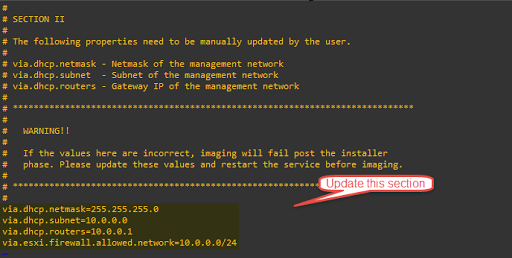
- SSH onto your Cloud Builder appliance and edit the via.properties file using vi or your preferred method, the file can be found here ‘/opt/vmware/evorack-imaging/config/via.properties’
- In Section II update the fields highlighted in the image below to suit your environment.
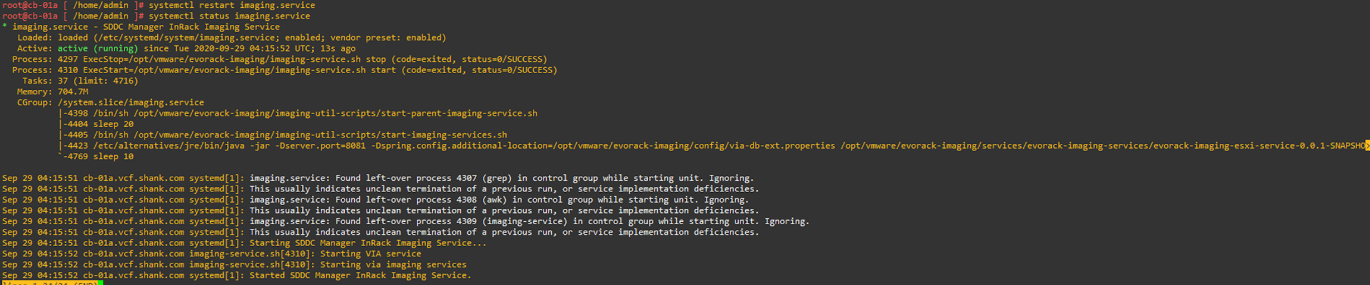
- After you have completed editing this file, the ‘imaging.service’ needs to be restarted, issue the command ‘systemctl restart imaging.service’, ensure the service restarts and comes back properly
- Once the service has come back up log in to VIA which can be found on port 8445 of the CloudBuilder appliance, in this case it is ‘https://10.0.0.221:8445/via/login.html’. Use the admin credentials that were supplied when deploying the CloudBuilder OVF.
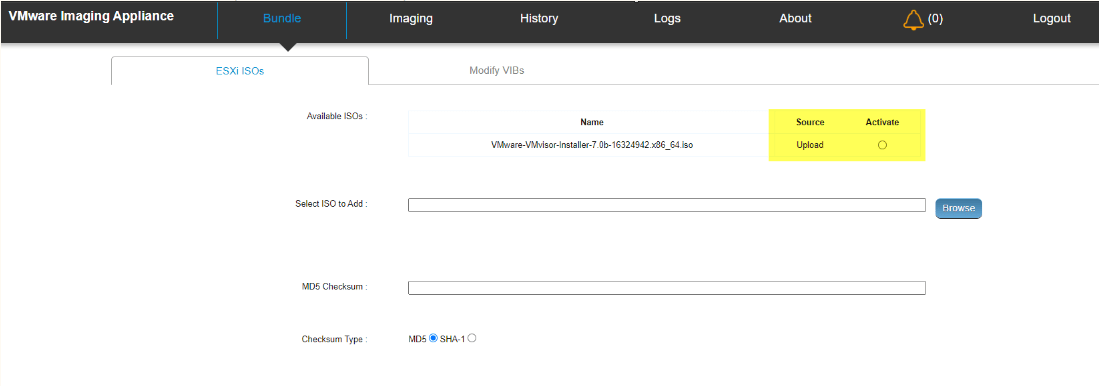
- As soon as you login you will be in the ‘Bundles’ tab, here you can browse to the ISO you obtained and enter in it’s MD5 Checksum. If you obtained the image from VMware downloads the MD5 can be found with the download.

- Once the upload is complete ensure you activate the image by selecting the radial button as can be seen below
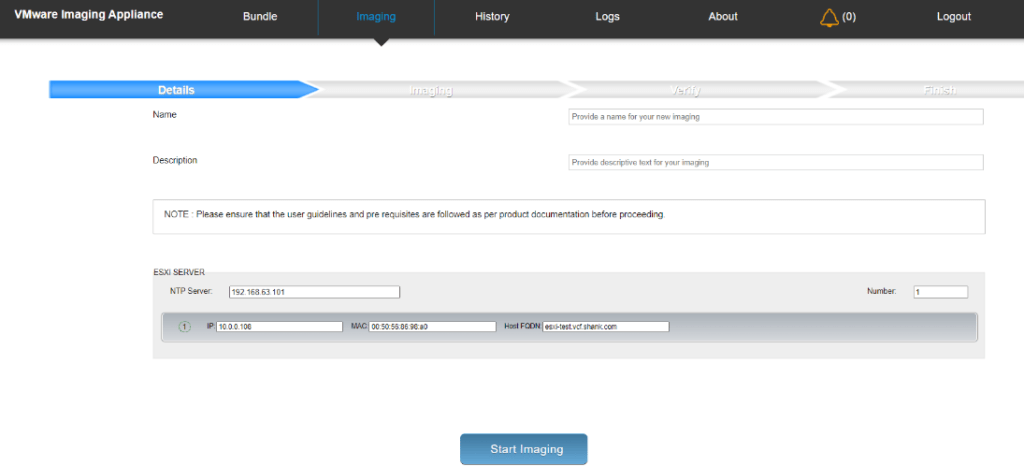
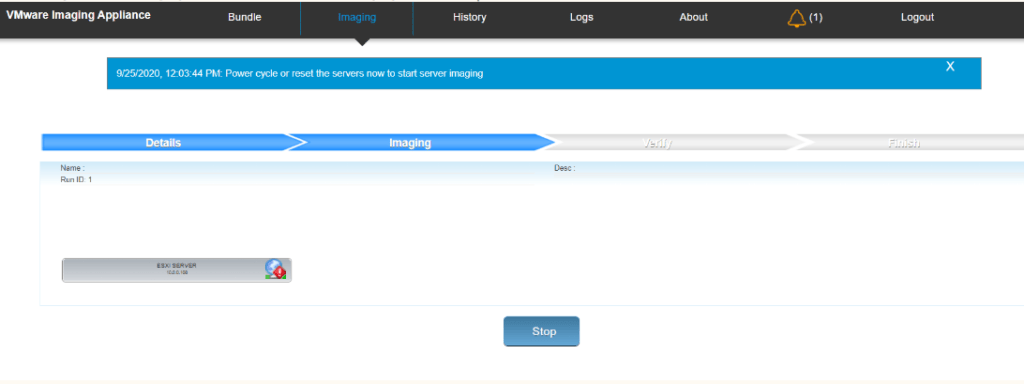
- Now move over to the ‘Imaging’ tab, fill in the details as required, the Name and Description are optional, once all the details are filled out click ‘Start Imaging’. Also note, if you change the number from 1 to however many hosts you need to image in the top right of the form, you may image several hosts at the same time.
- After clicking on ‘Start Imaging’ it will move over to the imaging screen and you will see the below after a short amount of time.
- Reboot the hosts to start the PXE process. While the hosts are being imaged you can tail the logs by SSH’ing onto Cloudbuilder and issuing the command tail -f /var/log/vmware/vcf/evorack-imaging/*.log, I generally like to tail all the logs however you can specify whichever log you want to follow. The other way of viewing logs is using the VIA UI and heading over to the ‘Logs’ tab. This is a great way to check the hosts are being picked up and if there are any issues during the PXE process. Also make sure there aren’t two DHCP servers on the subnet being used for imaging, this can also cause issues. The appliance and the hosts have to be on the same untagged network as well.
- After the process completes you may need to enable SSH on the hosts (change the policy to stop and start with host), I have also noticed that if you go to the firewall configuration on the host (Networking > Firewall Rules and scroll down to SSH Server, you may notice that the below is configured (to whatever subnet you entered in the via.properties settings). If this is the case for you, change it to ‘All connections from all IP addresses’

This concludes the section for imaging and preparing the hosts.
Commissioning Hosts for the Workload Domain using API
Before diving into this section you will need a bearer token for authorization to make the various API calls.
To get a bearer token import the code below into postman as raw text and substitute the required fields relevant to your environment;
curl --location --request POST 'https://sddcmanager.vcf.shank.com/v1/tokens'
	--header 'Content-Type: application/json'
	--header 'Accept: application/json'
	--data-raw '{
	  "username" : "[email protected]",
	  "password" : "VMware123!"
}'
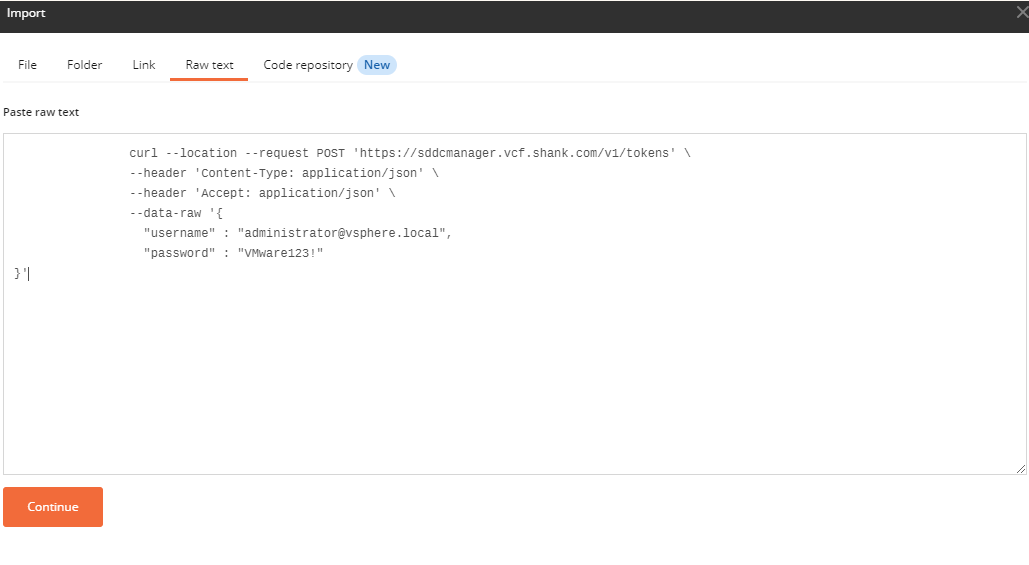
- Click continue and import on the next screen. You should now see this screen in postman.
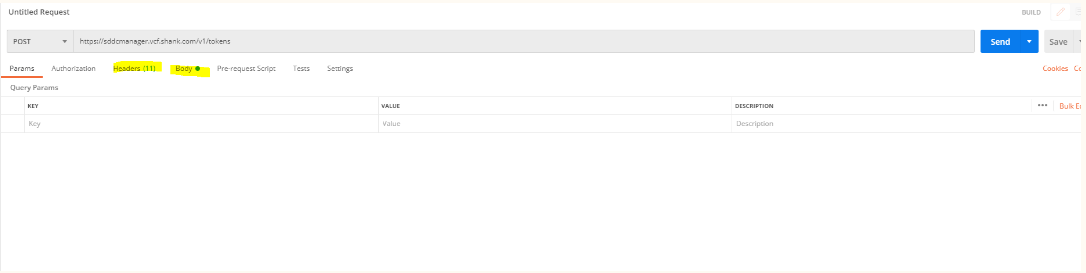
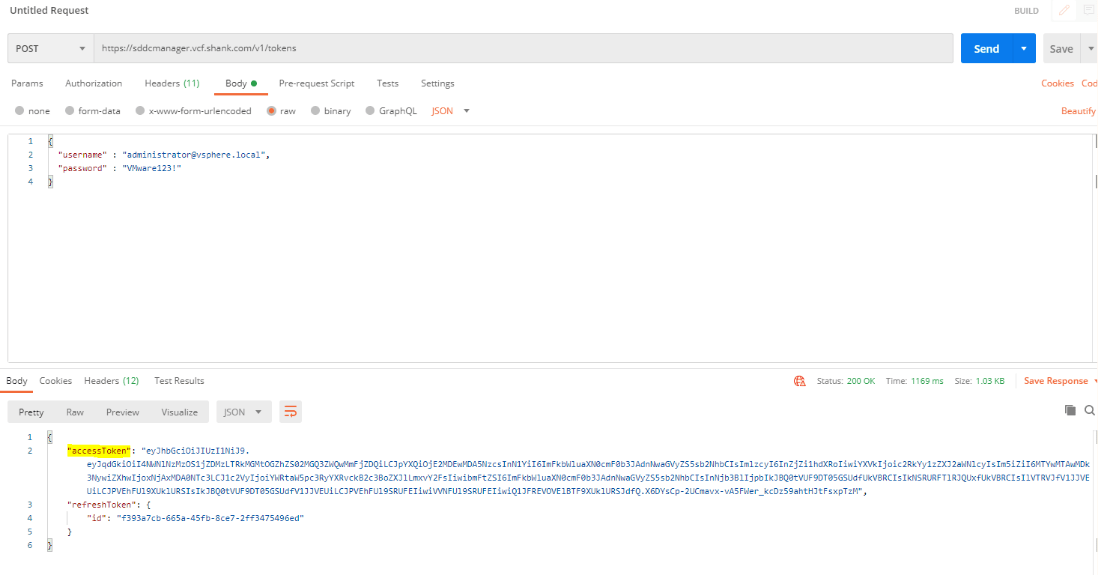
- If you click on headers you should see all the inputs you entered and in the body tab the user credentials we will be using to get a bearer token. After this, click send, and you should see an output similar to the below.
- Now we can create a network pool for the Workload Domain, this will include ranges for vSAN and vMotion. Ensure the pools have enough IP’s for all the hosts that are going to be added into this Workload Domain. The snippet below can be imported into postman or using curl directly
curl --location --request POST 'https://sddcmanager.vcf.shank.com/v1/network-pools'
	--header 'Content-Type: application/json'
	--header 'Authorization: Bearer <<your bearer token>>'
	--data-raw '{
	  "name" : "workload-domain-pool",
	  "networks" : [ {
	    "type" : "VSAN",
	    "vlanId" : 100,
	    "mtu" : 9000,
	    "subnet" : "10.0.10.0",
	    "mask" : "255.255.250.0",
	    "gateway" : "10.0.10.1",
	    "ipPools" : [ {
	      "start" : "10.0.10.10",
	      "end" : "10.0.10.20"
	    } ]
	  } ]
}'
- If you take the example command from the API reference guide you will get the output below, and that is because it is not defining the vMotion pool as well
{
	"errorCode": "MISSING_NETWORK",
	"arguments": [
	"engineering-networkpool"
	    ],
"message": "The networks of type VMOTION is mandatory but     was not provided.",
	    "causes": [
	        {
	            "type": "com.vmware.evo.sddc.networkpool.common.NetworkPoolApiException",
 "message": "The networks of type VMOTION is mandatory but was not provided."
	        }
	    ],
	    "referenceToken": "E9BTF5"
	}
- The correct code to create a network pool with both the vSAN and vMotion network pools is as follows (make sure you change the values to suit your environment) and hit send when it is ready
curl --location --request POST 'https://sddcmanager.vcf.shank.com/v1/network-pools'
	--header 'Content-Type: application/json'
	--header 'Authorization: Bearer <<your bearer token>>'
	--data-raw '{
	    "name" : "shank-lan-wld1",
	    "networks" : [ {
	        "type" : "VMOTION",
	        "vlanId" : 100,
	        "mtu" : 9000,
	        "subnet" : "10.0.10.0",
	        "mask" : "255.255.255.0",
	        "gateway" : "10.0.10.1",
	        "ipPools" : [ {
	        "start" : "10.0.10.10",
	        "end" : "10.0.10.20"
	        }]
	    },
	        {
	        "type" : "VSAN",
	        "vlanId" : 101,
	        "mtu" : 9000,
	        "subnet" : "10.0.11.0",
	        "mask" : "255.255.255.0",
	        "gateway" : "10.0.11.1",
	        "ipPools" : [ {
	        "start" : "10.0.11.10",
	        "end" : "10.0.11.20"
	        } ]
	    }]
	}'
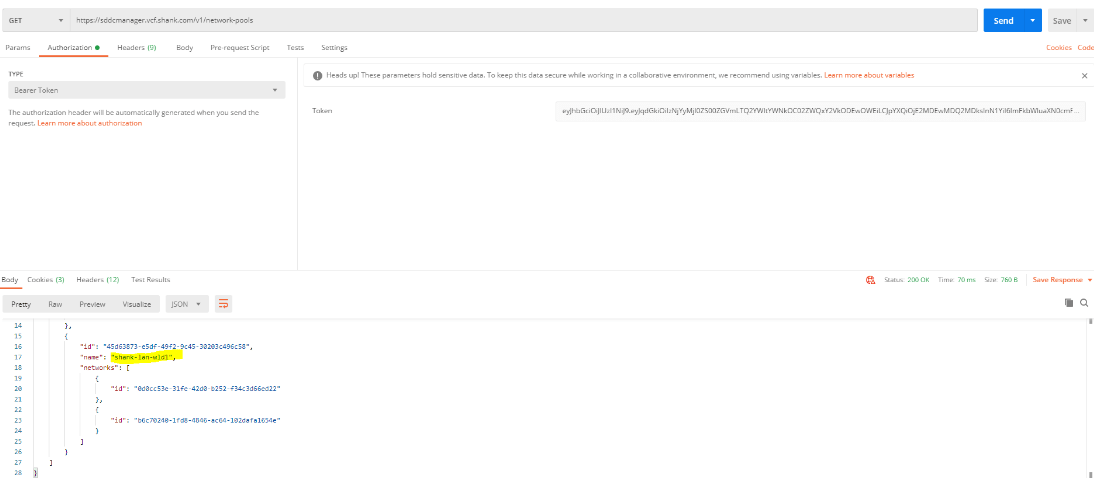
- We can check the creation of the network pool via the SDDC Manager or UI under network settings or using the API as well. You can use the same Postman form that you had open with the bearer token added, change the URI to the below and delete the contents of the body tab and it should look like the below.
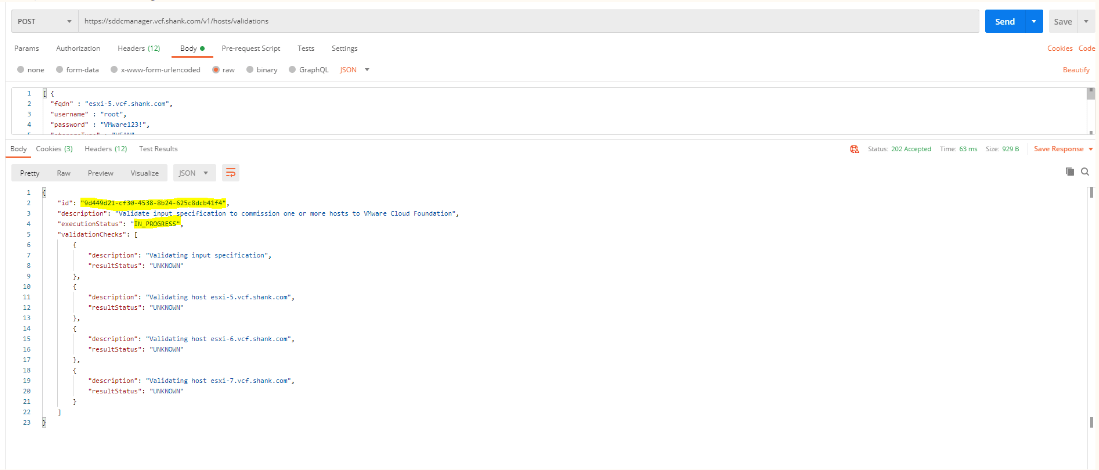
- Next you will have to commission the hosts, substitute the networkPoolID and networkPoolName for the values you received in the output above, first we validate the hosts
curl 'https://sddcmanager.vcf.shank.com/v1/hosts/validations' -i -X POST
		    -H 'Content-Type: application/json'
		    -H 'Authorization: Bearer <<your bearer token>>'
		    -d '[ {
		  "fqdn" : "esxi-5.vcf.shank.com",
		  "username" : "root",
		  "password" : "VMware123!",
		  "storageType" : "VSAN",
		  "networkPoolId" : "ede7cb01-c659-4083-b9a6-a0078661fdf1",
		  "networkPoolName" : "shank-lab-np01"
		}, {
		  "fqdn" : "esxi-6.vcf.shank.com",
		  "username" : "root",
		  "password" : "VMware123!",
		  "storageType" : "VSAN",
		  "networkPoolId" : "ede7cb01-c659-4083-b9a6-a0078661fdf1",
		  "networkPoolName" : "shank-lab-np01"
		}, {
		    "fqdn" : "esxi-7.vcf.shank.com",
		    "username" : "root",
		    "password" : "VMware123!",
		    "storageType" : "VSAN",
		    "networkPoolId" : "ede7cb01-c659-4083-b9a6-a0078661fdf1",
		    "networkPoolName" : "shank-lab-np01"
} ]''
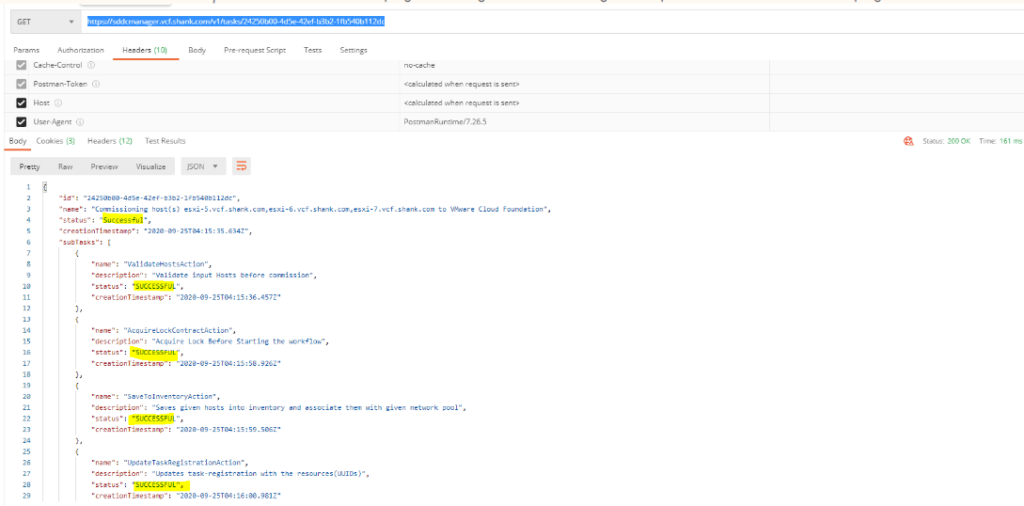
- The output from this request should look like the below
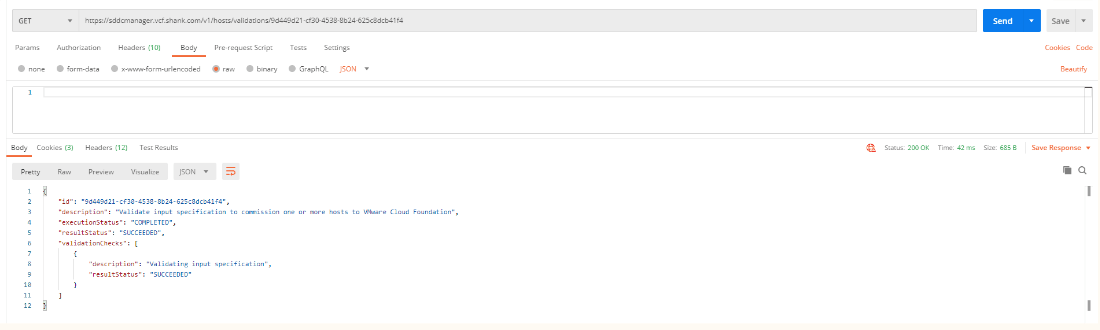
- You can use the ID above to check the status of the validation, see below (make sure you clear out the body tab as you will receive an invalid method error if you don’t)
- Now you can use the validated input from the previous step to commission the hosts using the below command
curl 'https://sddcmanager.vcf.shank.com/v1/hosts' -i -X POST
	    -H 'Content-Type: application/json'
	    -H 'Authorization: Bearer <<your bearer token>>'
	    -d '[ {
	  "fqdn" : "esxi-5.vcf.shank.com",
	  "username" : "root",
	  "password" : "VMware123!",
	  "storageType" : "VSAN",
	  "networkPoolId" : "ede7cb01-c659-4083-b9a6-a0078661fdf1",
	  "networkPoolName" : "shank-lab-np01"
	}, {
	  "fqdn" : "esxi-6.vcf.shank.com",
	  "username" : "root",
	  "password" : "VMware123!",
	  "storageType" : "VSAN",
	  "networkPoolId" : "ede7cb01-c659-4083-b9a6-a0078661fdf1",
	  "networkPoolName" : "shank-lab-np01"
	}, {
	    "fqdn" : "esxi-7.vcf.shank.com",
	    "username" : "root",
	    "password" : "VMware123!",
	    "storageType" : "VSAN",
	    "networkPoolId" : "ede7cb01-c659-4083-b9a6-a0078661fdf1",
	    "networkPoolName" : "shank-lab-np01"
	} ]''
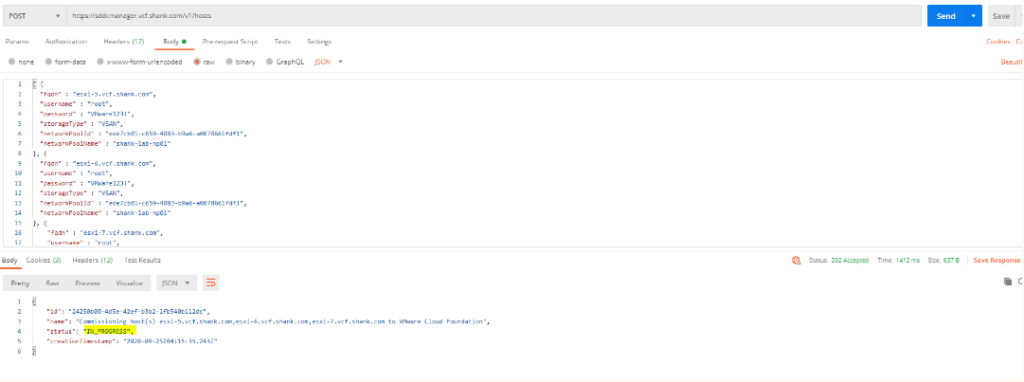
- Once the task has been submitted, you can either monitor its progress through the SDDC Manager UI or poll the below URI to view it’s progress.
Building the Workload Domain using API
Now that the hosts have been commissioned you can create the workload domain.
- first you will have to get all the ‘Unassigned and Usable’ hosts that were just commissioned, you can do this by sending a GET request to ‘ https://sddcmanager.vcf.shank.com/v1/hosts?status=UNASSIGNED_USEABLE’. Ensure you have an empty body and are using the bearer token

- Take the ID’s from above and insert them into the code below. Paste the ID’s into the “id” field under “hostSpecs”. As this is a VCF 4.x deployment, it now supports multinic hosts using two vSphere Distributed Switchs (vDS), instead of one vDS and one N-vDS as it was in version 3.9.x;
curl 'https://sddcmanager.vcf.shank/v1/domains/validations/creations' -i -X POST
		    -H 'Content-Type: application/json'
		    -H 'Authorization: Bearer <<your bearer>>'
		    -d '{

		     "domainName": "wld1",
		    "orgName": "shank",
		    "vcenterSpec": {
		      "name": "wld1-vc",
		      "networkDetailsSpec": {
		        "ipAddress": "10.0.0.253",
		        "dnsName": "wld1-vc.vcf.shank.com",
		        "gateway": "10.0.0.1",
		        "subnetMask": "255.255.255.0"
		    },
		    "licenseKey": "licenseKey",
		    "rootPassword": "VMware123!",
		    "datacenterName": "shank-wldc"
		  },
		  "computeSpec": {
		    "clusterSpecs": [
		      {
		        "name": "wld-cl01",
		        "hostSpecs": [
		          {
		       "id": "deb4e635-ceaf-490b-8104-828e459ce57a",
		            "licenseKey": "licenseKey",
		            "hostNetworkSpec": {
		              "vmNics": [
		                           {
		                           "id": "vmnic0",
		                           "vdsName": "vds01"
		                        },
		                        {
		                           "id": "vmnic1",
		                           "vdsName": "vds01"
		                        },
		                        {
		                           "id": "vmnic2",
		                           "vdsName": "vds02"
		                        },
		                        {
		                           "id": "vmnic3",
		                           "vdsName": "vds02"
		                        }
		                    ]
		                 }
		              },
		              {
		        "id": "8d0d9526-e7fa-4452-8620-3ff45454b451",
		                "licenseKey":"licenseKey",
		                "hostNetworkSpec": {
		                       "vmNics": [
		                           {
		                           "id": "vmnic0",
		                           "vdsName": "vds01"
		                        },
		                        {
		                           "id": "vmnic1",
		                           "vdsName": "vds01"
		                        },
		                        {
		                           "id": "vmnic2",
		                           "vdsName": "vds02"
		                        },
		                        {
		                           "id": "vmnic3",
		                           "vdsName": "vds02"
		                        }
		                    ]
		                 }
		              },
		              {
		        "id": "1186ad88-80ec-4bc5-9836-ebf02935a97c",
		                "licenseKey":"licenseKey",
		                "hostNetworkSpec": {
		                       "vmNics": [
		                           {
		                           "id": "vmnic0",
		                           "vdsName": "vds01"
		                        },
		                        {
		                           "id": "vmnic1",
		                           "vdsName": "vds01"
		                        },
		                        {
		                           "id": "vmnic2",
		                           "vdsName": "vds02"
		                        },
		                        {
		                           "id": "vmnic3",
		                           "vdsName": "vds02"
		                        }
		                    ]
		                 }
		              }
		              ],
		      "datastoreSpec": {
		          "vsanDatastoreSpec": {
		              "failuresToTolerate": 1,
		              "licenseKey": "licenseKey",
		              "datastoreName": "vsan-wld"
		         }
		     },
		     "networkSpec": {
		      "vdsSpecs": [
		        {
		          "name": "vds01",
		          "portGroupSpecs": [
		            {
		              "name": "vds01-pg-mgmt",
		              "transportType": "MANAGEMENT"
		            },
		            {
		              "name": "vds01-pg-vsan",
		              "transportType": "VSAN"
		            },
		            {
		               "name": "vds01-pg-vmotion",
		               "transportType": "VMOTION"
		            }
		        ]
		        }, {
		        "name" : "vds02",
		          "isUsedByNsxt" : true
		        }
		        ],

		         "nsxClusterSpec": {
		             "nsxTClusterSpec": {
		                 "geneveVlanId": 13
		                }
		            }
		          }
		        }
		      ]
		    },
		    "nsxTSpec": {
		        "nsxManagerSpecs": [
		          {
		            "name": "wld-nsx01a",
		            "networkDetailsSpec": {
		              "ipAddress": "10.0.0.81",
		              "dnsName": "wld-nsx01a.vcf.shank.com",
		              "gateway": "10.0.0.1",
		              "subnetMask": "255.255.255.0"
		            }
		          },
		          {
		            "name": "wld-nsx01b",
		            "networkDetailsSpec": {
		              "ipAddress": "10.0.0.82",
		              "dnsName": "wld-nsx01b.vcf.shank.com",
		              "gateway": "10.0.0.1",
		              "subnetMask": "255.255.255.0"
		            }
		          },
		          {
		            "name": "wld-nsx01c",
		            "networkDetailsSpec": {
		              "ipAddress": "10.0.0.83",
		              "dnsName": "wld-nsx01c.vcf.shank.com",
		              "gateway": "10.0.0.1",
		              "subnetMask": "255.255.255.0"
		            }
		          }
		        ],
		        "vip": "10.0.0.80",
		        "vipFqdn": "wld-nsx01.vcf.shank.com",
		        "licenseKey": "licenseKey",
		        "nsxManagerAdminPassword": "passw0rd!"
		      }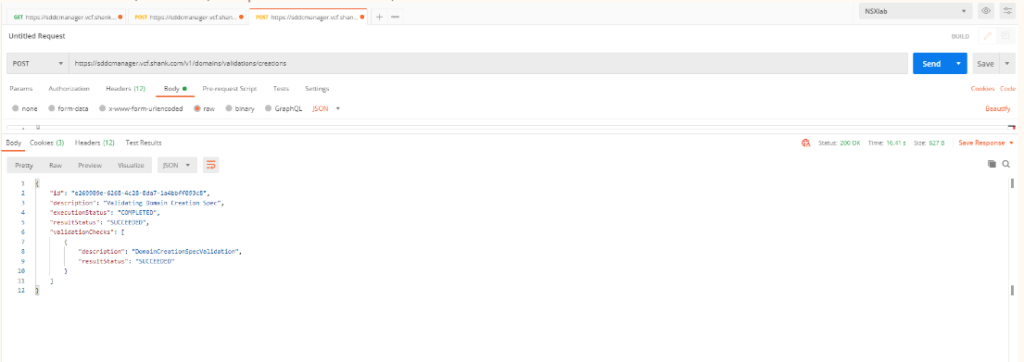
}'- If all goes well you will get a succeeded result, what this means is the input form you entered above passed validation. Notice the URI that was hit was a validation, this is an important step and you do not want to skip it
- Now that the spec was validated and successful, we can use the exact same input to bring up with Workload Domain. Change the URI to ‘https://sddcmanager.vcf.shank.com/v1/domains’ and hit send, the WLD should start building
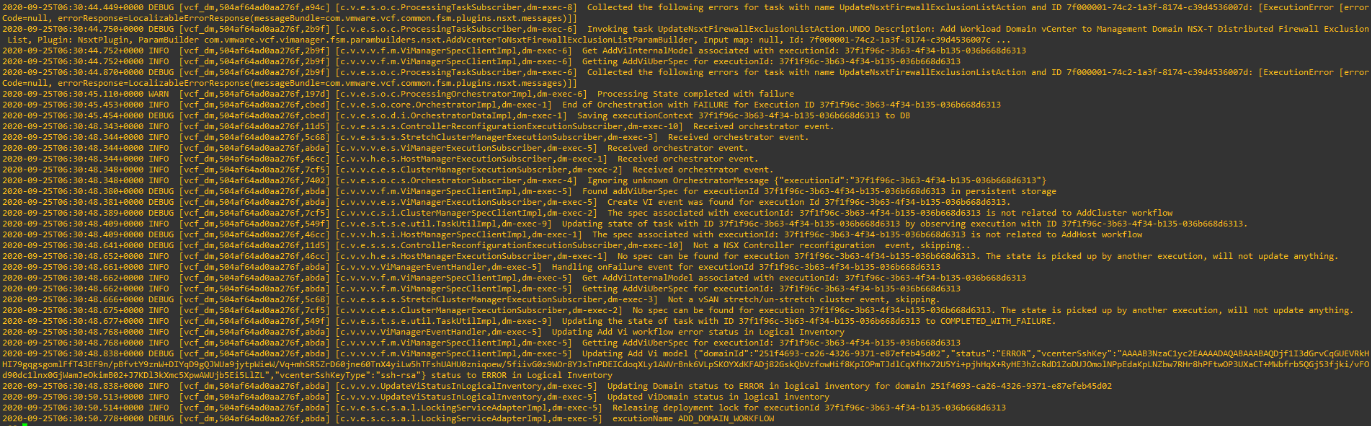
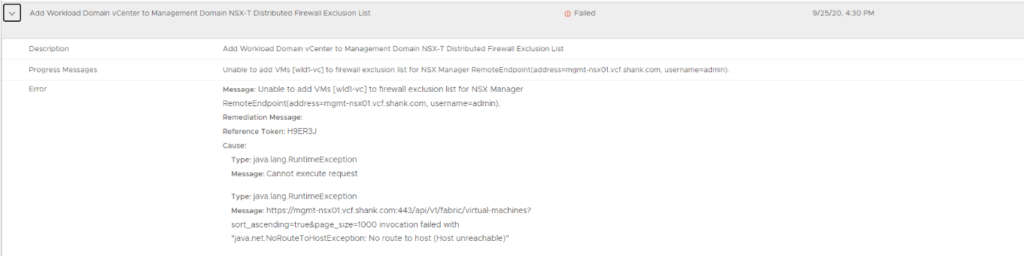
- During the domain creation process, I like to tail the logs here ‘tail -f /var/log/vmware/vcf/domainmanager/domainmanager.log’. If the bring up gets stuck at any point you can generally figure out what the cause was from this log. I have shown one example of a bringup failure below (bring up task can be restarted one the issue is resolved). The process can also be monitored via the UI
- Once all issues are resolved and the domain is created you should see something similar to the below image

That’s all there is to it, the workload domain creation is now complete!
Here are a few tips and tricks during the bring up if you require them….
- tail -f /var/log/vmware/vcf/domainmanager/domainmanager.log – to see any domain related operations, such as bringing up the workload domain
- tail -f /var/log/vmware/vcf/operationsmanager/operationsmanager.log – to see any general SDDC Manager operations
- /opt/vmware/vcf/domainmanager/config/application-prod.properties – this file can be edited in your lab environment to scale down the deployment (not supported by VMware for production systems and in no way something VMware endorses)

- Once the file has been modified, you will need to restart the domainmanager service; systemctl restart domainmanager. Ensure the service starts again properly (tail the domainmanager log while restarting the service). You may see the below output;
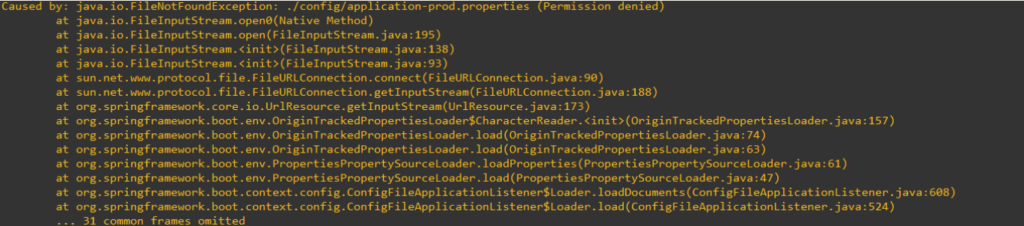
- The above is basically saying the file /opt/vmware/vcf/domainmanager/config/application-prod.properties has incorrect permissions so when the user vcf_domainmanger attempts to access the file to read it, it can’t.
- Check the permissions on the file with ls -lhrt, notice the permissions are root:root, this needs to be changed to vcf_domainmanager:vcf – ‘chown vcf_domainmanager:vcf application-prod.properties’

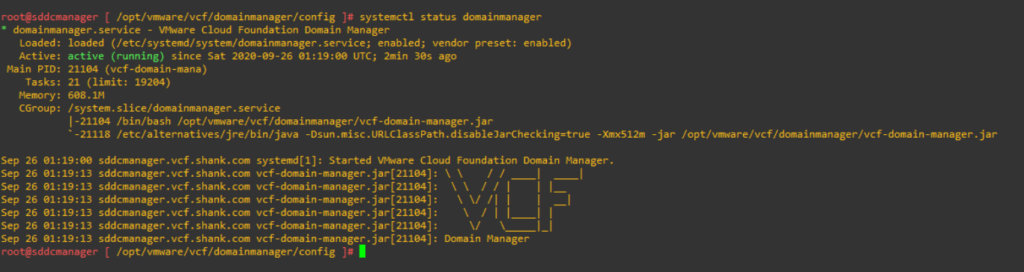
- Restart the service whilst tailing the domainmanager.log again and you should now see this output and no more permission denied in the log while trying to create the domain.
If there is anything that you require further clarification on or does not make too much sense please let me know!